30 BEAUTIFUL Kananaskis Hikes To Tackle

Alberta is blessed with some gorgeous mountains and provincial parks to explore; most notable are the wonderful hiking trails in the collection of parks which form Kananaskis. Life in Canmore has given us the chance to spend our summers exploring the many spectacular Kananaskis hikes.
I want to share our favourite Kananaskis hikes from our many summers in the Canadian Rockies. We will continue to update this list every year as we get out more. Here are the best hikes in Kananaskis, in no particular order. See the detailed post mentioned for more information on the hikes and trails.
A Pass is Needed to Hike in Kananaskis
Visitors are required to hold a Kananaskis Conservation Pass, which covers Kananaskis and the Bow Valley Corridor. This pass is separate from the National Parks Pass needed to visit Banff and the other national parks. Passes may be purchased online and are attached to a license plate number. Requirements are around vehicles and parking, not the individual. This includes parking at the Canmore Nordic Center or Grassi Lakes.
Pass Prices
- Daily Pass: $15 (registers one vehicle)
- Annual Pass: $90 (registers two cars)
A Guide to Understanding the Kananaskis Conservation Pass
When Is The Best Time To Hike In Kananaskis?
The best time to go hiking in Kananaskis is July and August. During these months, most of the snow on high-elevation hikes in the area has disappeared. Of course, every season is different. The snow disappears early in some years; in others, it holds until the last weeks of summer. However, the “Front Range” is the driest section of the Canadian Rockies.
Snow is only a factor on the most prominent mountain summits, like Mount Sarrail or Mist Mountain. It’s best to aim for these mountains late in the summer. That said, the hiking season in Kananaskis *officially* starts in mid-May (for us, anyway), as this is when the ski season ends and our brains immediately switch to hiking and biking.
In May, you’ll be able to get out on lower elevation Kananaskis hikes like the Prairie View Trail in Kananaskis without the risk of snow. As the summer progresses, your choice of hikes will expand, and you can work your way up to the higher elevation hikes. The Tent Ridge or Rimwall Summit hikes are a great option by early June.

Access is limited to a few hikes that are off the section of Highway 40 known as Highwood Pass. When the pass opens around mid-June, it supplies access to these trails and peaks, some of the most popular in Kananaskis, such as Mist Mountain, Arethusa Cirque, and Pocatera Ridge.
The hiking season typically lasts well into September (larch season!) and the first few weeks of October, depending on the year. This is not to say that you cannot hike in the winter, because there are plenty of fun trails. You’ll just have to hike with winter conditions and temperatures in mind, and of course, micro spikes and hiking poles never hurt. See some of our favourite winter hiking trails in Kananaskis.
The Best Kananaskis Hikes
Smutwood Peak

Smutwood Peak is one of our favourites and possibly one of the best hikes in the Province. The views from the summit of the unofficial peak are phenomenal. It’s not just the summit views; the hike offers plenty of nice views as it winds along a creekside meadow and climbs a pass. It’s best done in a group as it is a common grizzly habitat. We even had one split our group in half.
The first hour or so of this Kananaskis hike is straightforward, with no elevation gain. You’ll pass an incredible waterfall, and once you get into the alpine meadow, the views are amazing. Your first taste of steepness is going into Smuts Pass, where it’s relentless uphill for 2 km or so, but then lightens up again as you first lay your eyes on Mount Birdwood.
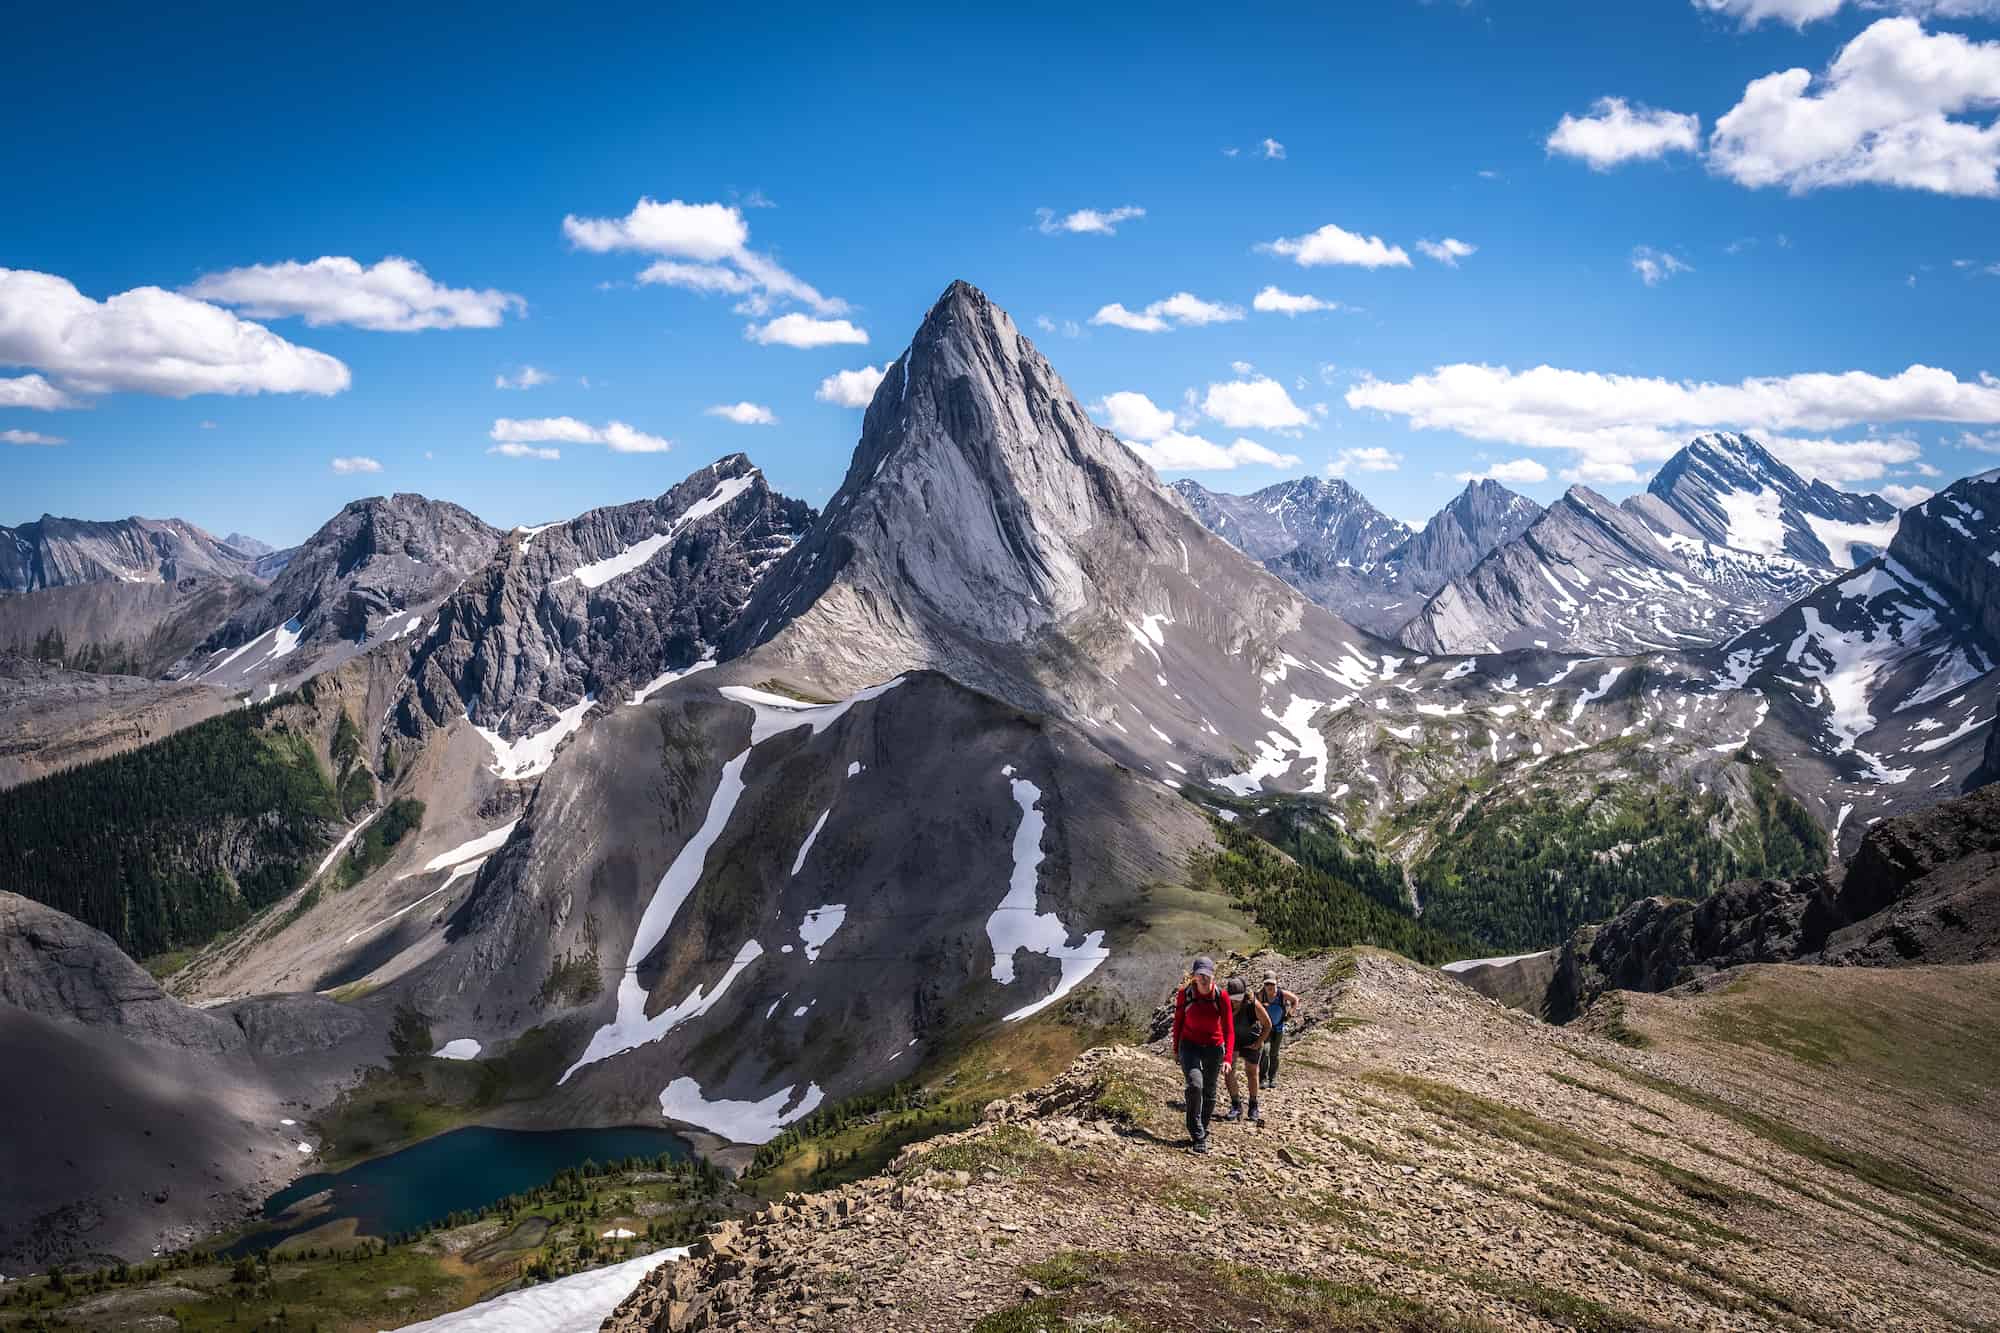
It’s a popular trail, but most hikers top at the pass or saddle and enjoy the two small lakes. The route from the saddle of Mount Birdwood (the most notable peak in the photos) up to the top of Smutwood Peak looks daunting, but it’s easier and shorter than it seems.
The view from the false summit of Birdwood is great, but continue on to the true summit for 360-degree views. This is where the route gets a bit scrambly and slightly exposed. A fall here certainly wouldn’t be good, but it’s not certain death. Smutwood Peak took our group 6 hours with a 45-minute summit break. I would readily do it again!
Tent Ridge

Tent Horseshoe Ridge is a beautiful loop trail just an hour’s drive from Canmore. It’s possibly the most popular hike among locals because of its sweeping views over the Spray Valley. It also helps that it’s a reasonable loop trail that can be done in a half-day. It’s around 10km and takes the average hiker four to five hours to complete, with plenty of time for photo stops.

A few steep pitches will have you panting, but it’s rated as hard because of the scramble up (or down, depending on which way you go) from the ridge. We saw all ages and skill levels on the trail, and the scramble was slightly exposed in two sections but not too sketchy.

This trail is best between June and October, though I’ve seen photos in the winter, and the images are gorgeous. If you do a shoulder-season hike, ensure you have gaiters, crampons, and poles. You should also have proper Avalanche training; deaths have occurred back here due to avalanche terrain. We hiked this trail on Canada Day weekend (July 1st). There were a few spots with slushy snow, but it was a dry trail for the most part.
South Lawson Peak

South Lawson is a rocky subpeak that offers tremendous views of the convergence of two valleys and the Kananaskis region. Best of all, the peak is relatively easy to reach with simple navigation, no scrambling, and moderate elevation gain to the summit. It’s a good early-season hike as the ridge tends to dry out fairly quickly, and it’s a hot spot for wildflowers near the summit.


Most notable is its relatively undiscovered status, which sees a fraction of the hikers compared to more popular options in Kananaskis. On the day of our hike, a dozen people were on the trail in total, and as we were the last to start our day, we had the summit to ourselves. The trailhead has limited parking, which may be an issue on busy weekends.

The trail starts just north of Lower Kananaskis Lake, and the summit provides tremendous views of the two Kananaskis Lakes. It begins along a drainage system that feeds into the lakes, then climbs through the forest to the rocky subpeak. As the hike follows the ridge to the summit, you get the occasional view out through the forest, so it’s not overly tedious or boring.
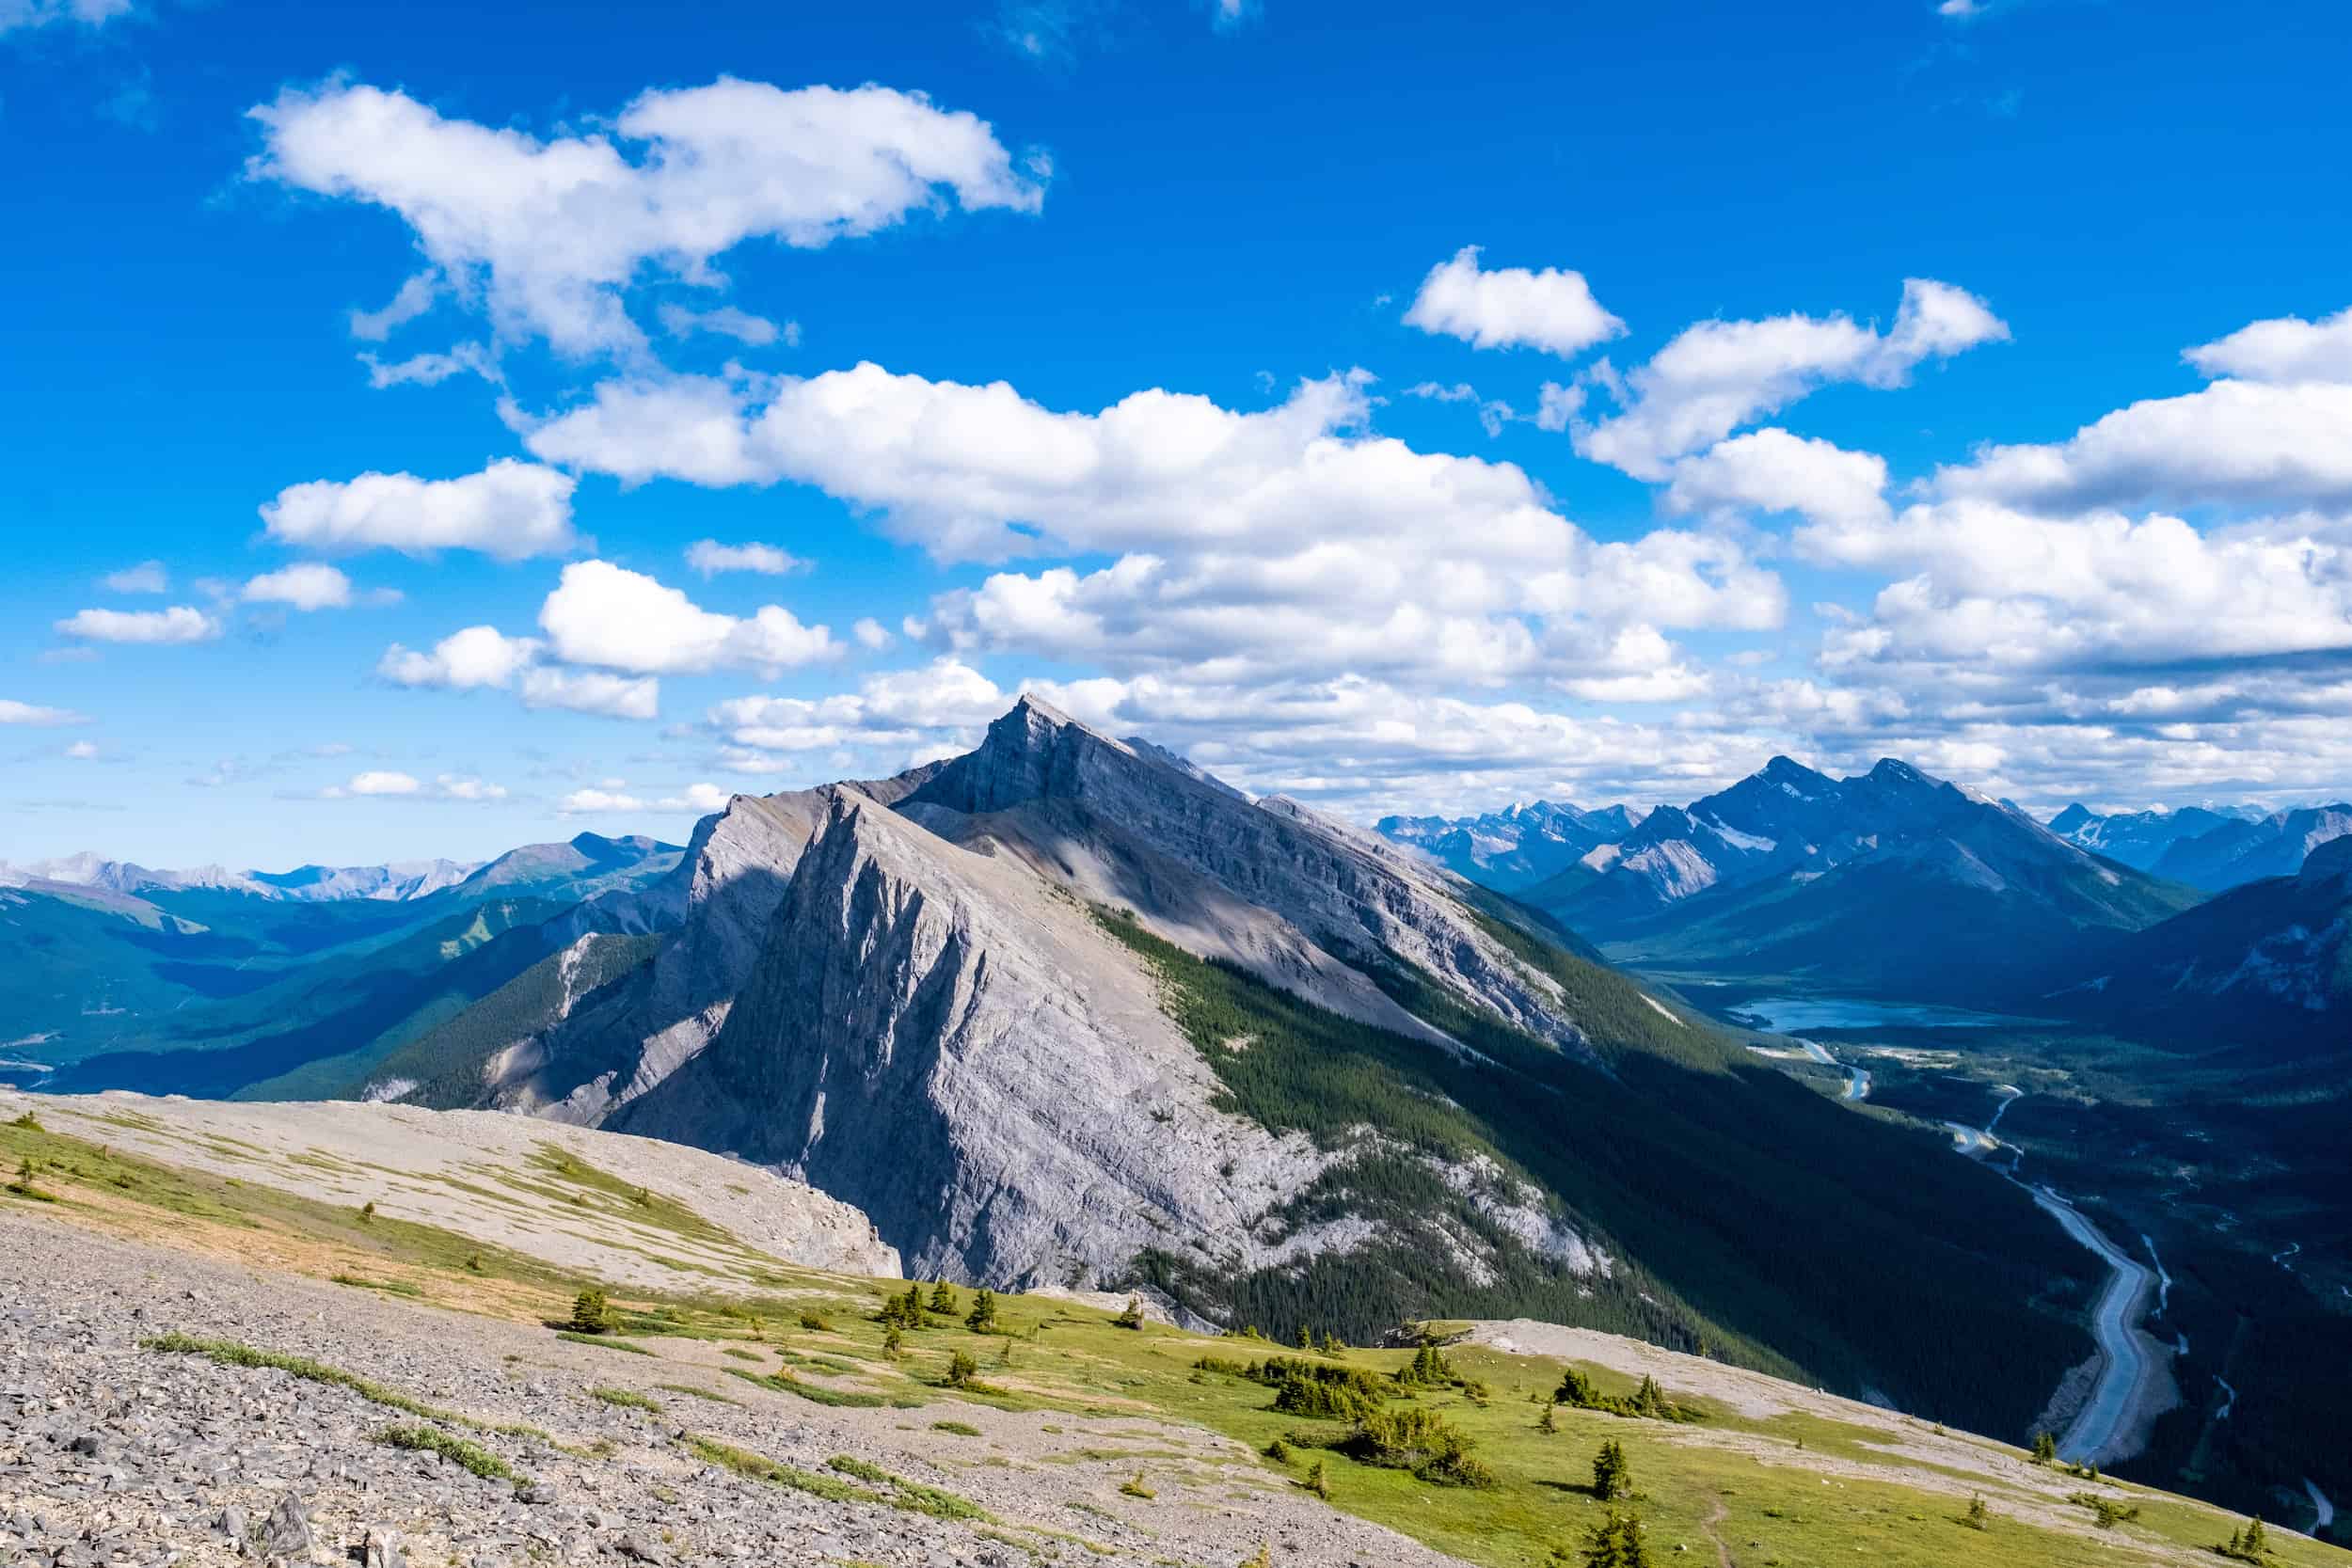
East End of Rundle (EEOR)

The East End of Rundle is a classic summit near Canmore. It’s also one of the best efforts vs. reward in all regions, with breathtaking views of Spray Valley, Canmore, and Ha Ling Peak in a brief time. Its proximity to downtown Canmore and relative ease mean it’s a popular hike, especially on the weekends. Hikers get views down the Spray Valley to the East, Ha Ling Peak, and Mount Lawrence Grassi.

However, just because the East End of Rundle (or EEOR, or “Eeyore” as locals call it) is close to town doesn’t mean it’s an easy climb up to the summit. The ascent makes several switchbacks, followed by a few rocky sections, then relentless scree, before several more rocky sections that may require a handhold. It’s nothing complicated, and any hiker should be able to handle the terrain, but it is steep to the summit.
The trail to the peak is relatively easy to follow, with small pieces of tape, painted rocks, and cairns. However, getting off trail is easy if you stop paying attention—especially on the way down. Goats love the area, and there are a ton of trails that lead off to the edge of cliffs.
The climb to the summit is considered a scramble as the last section of the trail requires ascending a small headwall. It involves using hands, and we recommend a helmet on busy summer days due to the risk of rockfall from parties above. After the scramble and you’ve reached the summit, enjoy the views of Canmore!
Little Lougheed

Mount Little Lougheed is one of the easiest summits in Kananaskis. It offers a fantastic view over the Spray Lakes and is much less popular than nearby Tent Ridge.

Just because it’s one of the easiest summits doesn’t exactly make it easy. You’ll still climb over 700 meters in under 4km, so in other words, it’s very steep. The push to the summit will get you panting, and the way back down requires stability.
Once at the top, you’ll have unparalleled views of Mount Lougheed and Mount Sparrowhawk. I recommend bringing a pole for this one. You’ll thank me on the way down!
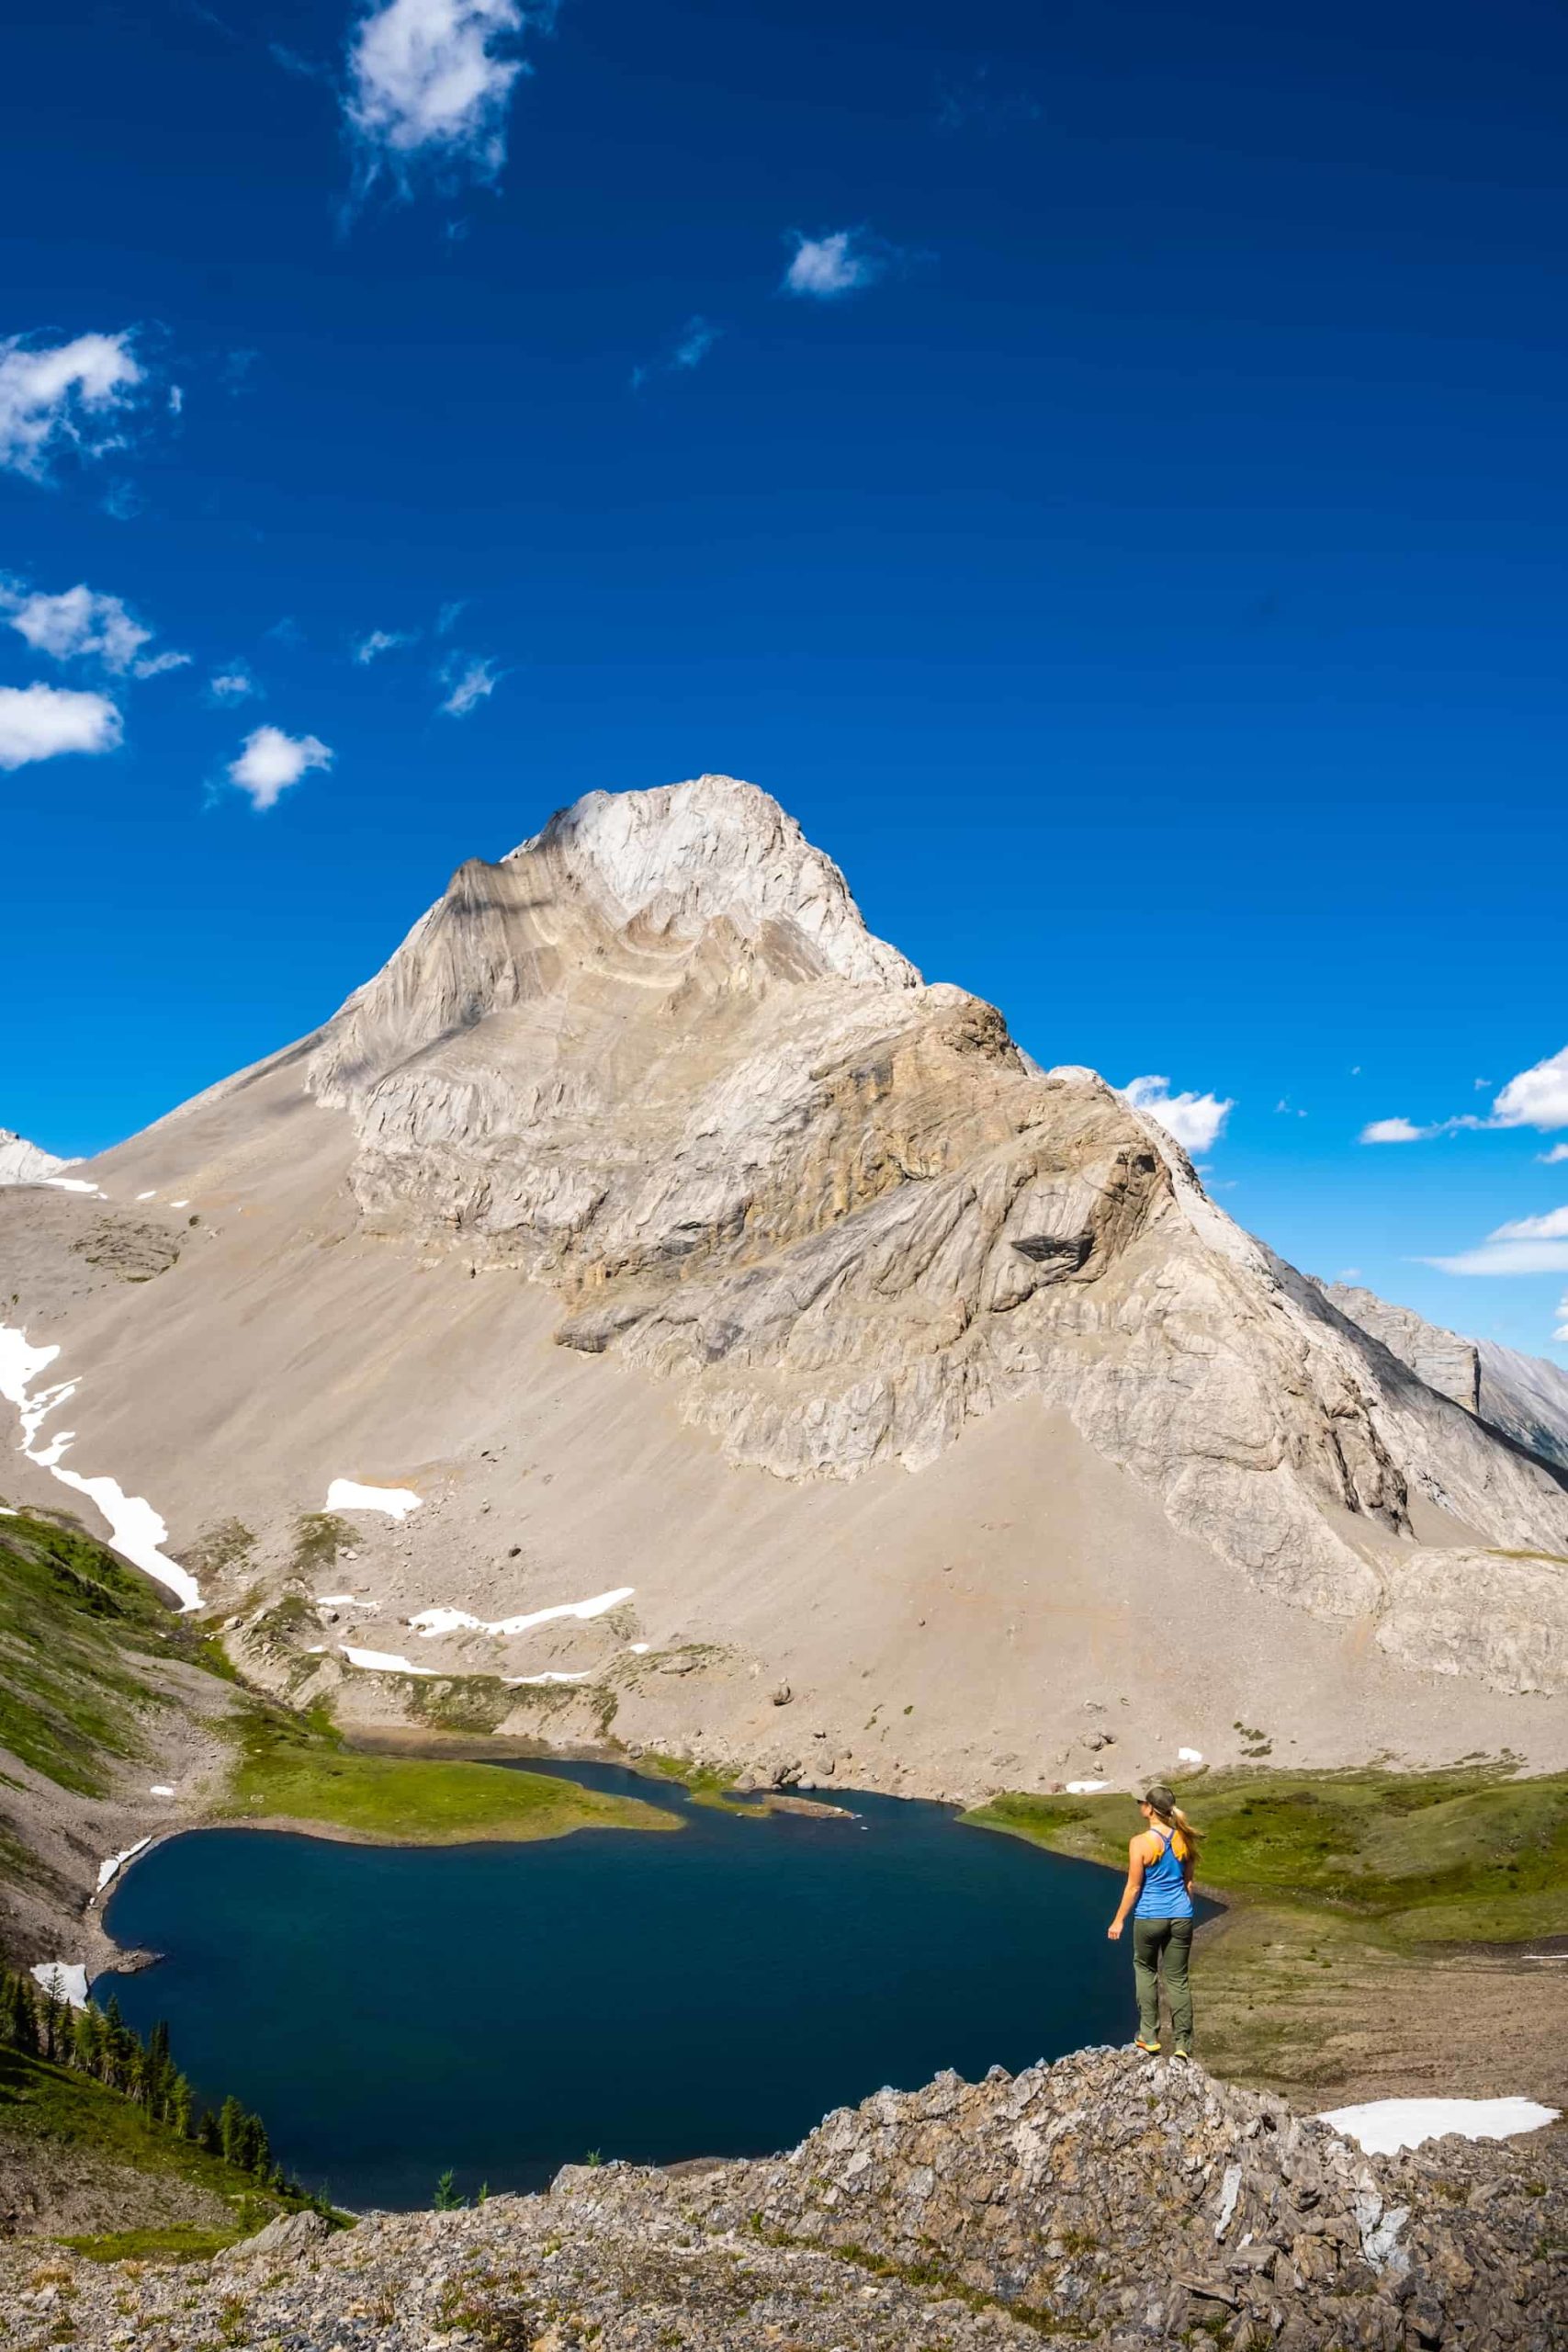
South Buller Pass

South Buller Pass may be the most underrated trail in all of Kananaskis Country, as it is well built and the views at the pass summit are surreal. Granted, it may remain relatively quiet given its further location along the Smith Dorrien Highway and frequent bear activity.

The elevation gain through the forest and subalpine zone is gradual, making for pleasant hiking. It’s not until the final push towards the pass’s summit that the trail gains notable elevation. For those who like larch hikes, the subalpine leading up to the pass is full of larches, so it may be worth saving this one for your fall hikes.

At the pass summit, the trail provides views down the Ribbon Lake and the vast alpine meadow of rolling hills. It is possible to make the trail a large loop connecting the more northern Buller Pass with South Buller Pass. It’s an amazing hike, but it does require some route finding as it is not an official trail. The trail up to Buller Pass is also not an official/maintained trail, so it’s much rougher.

We recommend most stick to the classic South Buller Pass summit. As the meadow is a prime habitat for grizzly bears and a large male is frequently spotted here, we did have an interaction with him at the top of the more northerly Buller Pass. Due to this, we highly recommend checking with Alberta Parks for any trail notices and reporting any grizzly interactions.
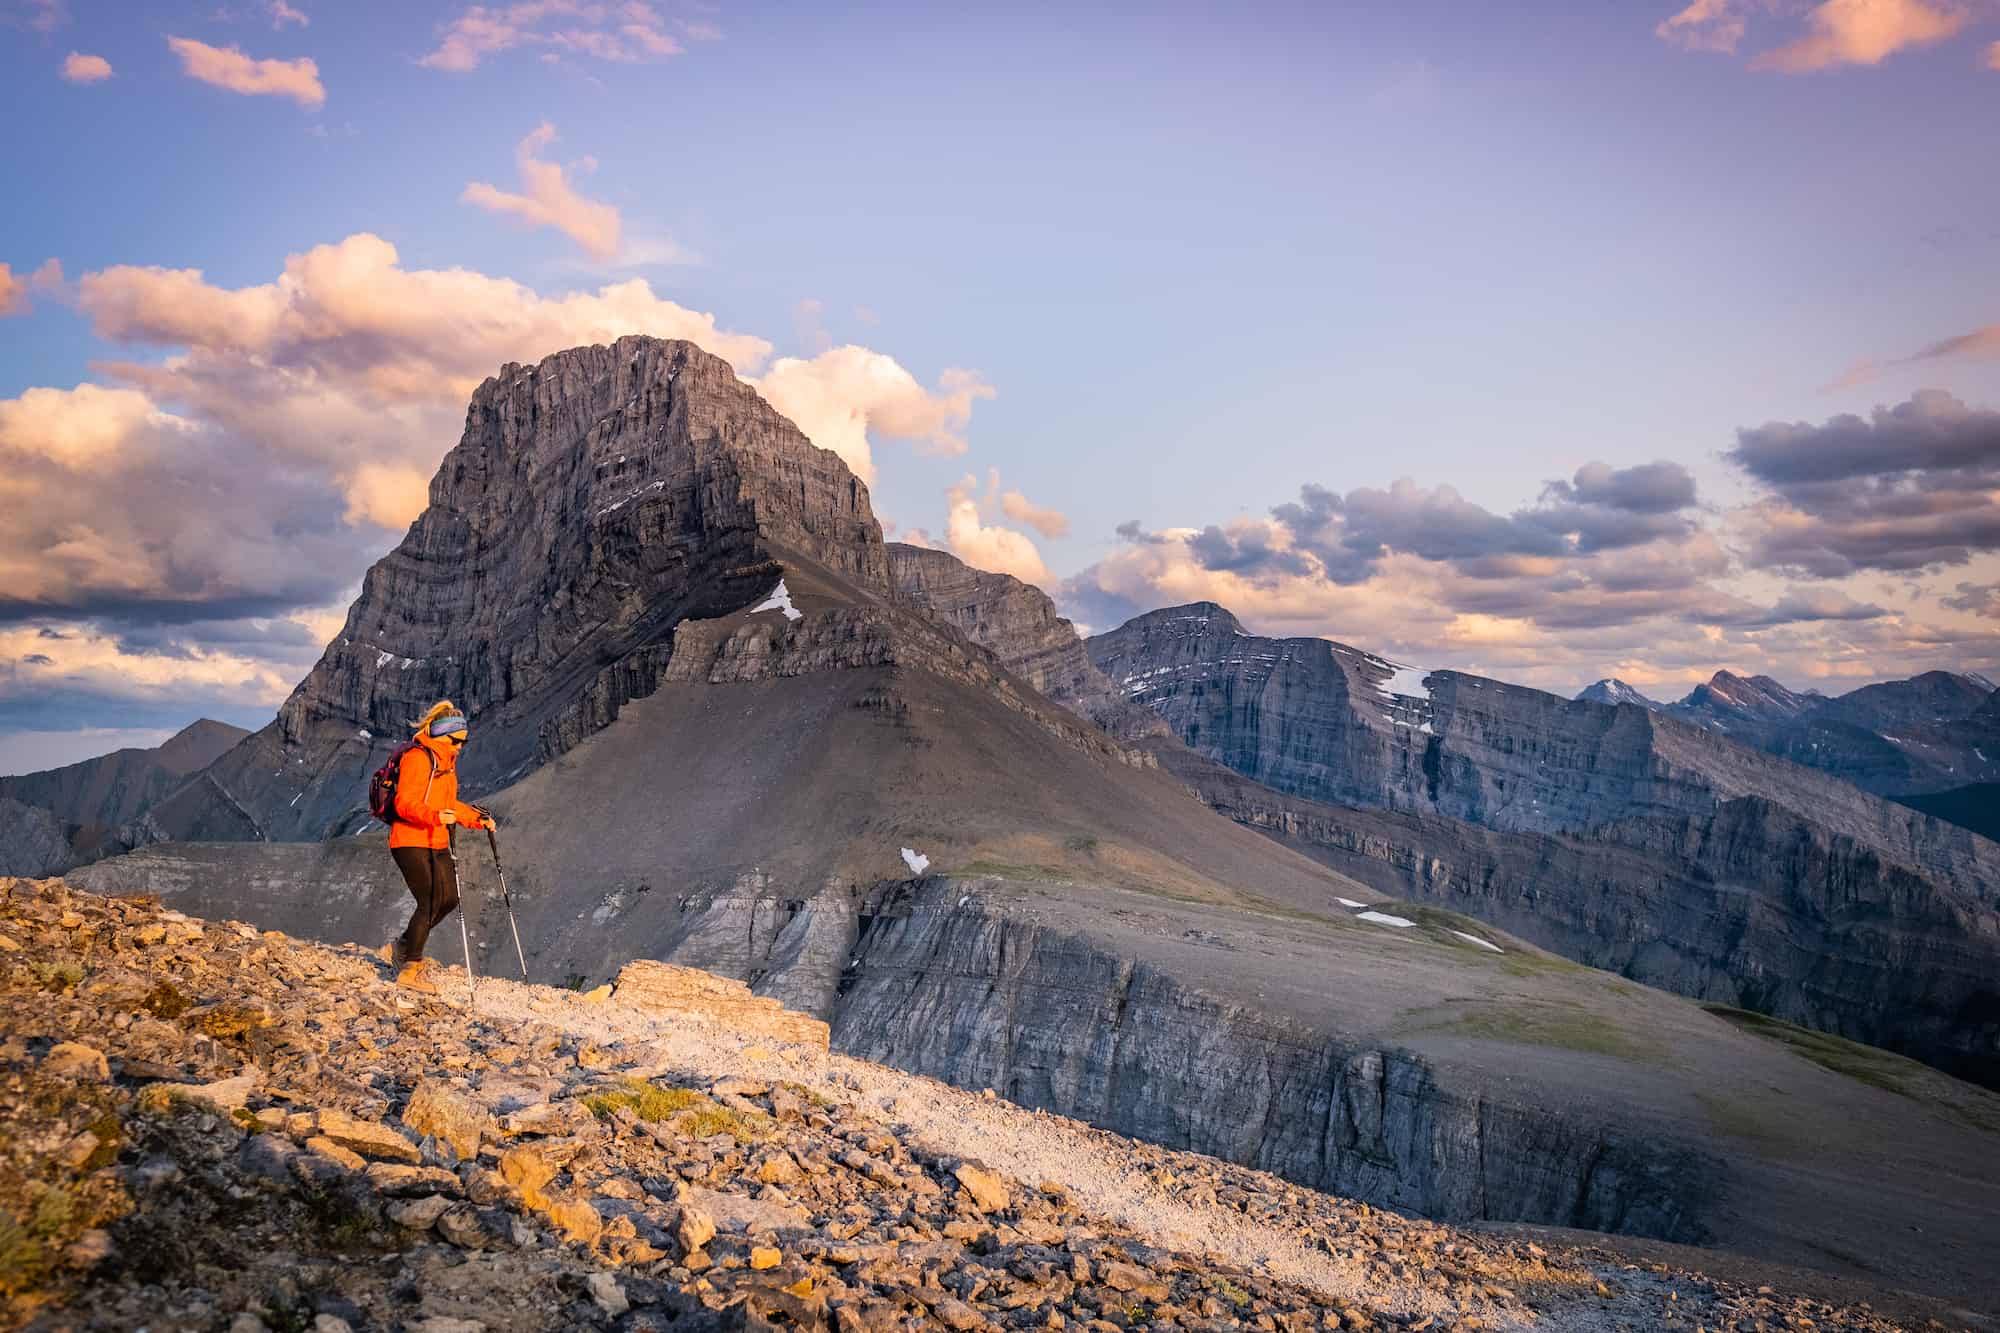
Mount Lipsett

Mount Lipsett is an easy peak to bag in Kananaskis. However, just because it’s an easy peak doesn’t make it a particularly easy hike, as you’ll have to trek nearly 15 km round-trip. Though there is nothing technical or scrambly on any portion of this hike – perfect for those that don’t want to use their hands at any point.
Though the trail starts out boring, once you get above the tree line, you’ll have expansive views of the entire valley. As you work your way to the summit, you’ll get to enjoy views of the mammoth Mist Mountain right ahead.

The final push to the summit is perhaps the hardest 10 minutes of this entire hike, as the terrain becomes moderately steep. Once at the summit, admire the views of Mist Mountain and down the entire valley.
In the summer, the wildflowers are abundant, and you’ll be met with bursts of yellow, purple, and red on each step. Because of this, we recommend completing this hike in July and August.
Troll Falls

Troll Falls is a classic hike in Kananaskis that’s good year-round. Best of all, it’s very family-friendly at less than 5km with minimal elevation gain. It’s a little easier than Grassi Lakes, and the trail to the waterfalls crosses pleasant meadows, creeks, and forest.

It’s a tremendous hike, and the reward is an incredible waterfall set in an ideal location. There is more than one waterfall, too, as it’s possible to continue above the falls to Marmot Falls and Upper Troll Falls. We suggest following the Hay Meadow Trail at the start or end to make it a loop hike.
That said, it can draw a real crowd on busy summer weekends, but on a weekday, it’s still a pleasant hike. The winter is equally impressive, with the waterfalls freezing—the same goes for the trails, so bring microspikes.
Read’s Tower

Read’s Tower is perfect for those who want fantastic views over Spray Lakes but don’t want to put in a whole day’s effort to get up. This is less than a 4-hour round-trip hike, but you can keep going past to scramble Mount Sparrowhawk for a full day. Granted, that’s a big mountain and a much larger endeavour.

The first hour or so of Read’s Tower winds through the forest. Get used to going uphill, as it never lets up once you start. Fight the rock slide and slabs uphill until it opens up. From there, you’ll get a great view of Mount Sparrowhawk and Read’s Tower. The trail forks for the summit of Read’s Tower or Mount Sparrowhawk. The latter is a 3000-meter mountain with a much larger objective and involves more scrambling and a full day.
If you choose just Read’s Tower, it’s another 45-minute to an hour scree climb to the summit. Going up the treadmill of scree can be brutal, but the scree run down is fun and quick! Read’s Tower is a rewarding hike with low exposure and minimal scrambling effort. To make it a full day, consider scrambling up the much larger and more challenging Mount Sparrowhawk (1,342 m gain/ 9.2 km).
Windtower

Windtower provides views over the Spray Lakes Reservoir, similar to Read’s Tower; with a bit more effort, it offers far better views. The start of the trail follows the same route as West Wind Pass, which is well-trodden and easy to follow. The hike to the pass is a good moderate hike that takes around an hour to reach uphill. It’s perfect for families or those looking for a smaller objective.
From the pass, the climb up to the summit of Windtower takes about another hour. It involves some light scrambling as you negotiate a few cliff bands, but it is very simple and involves a moderate incline to the summit. We recommend that you possess good route-finding skills and GPX tracks to ensure you do not stray from the summit. On our hike, we watched two men stray far from the route and miss their summit attempt as they got lost.

The summit offers wonderful views over Spray Lake, the Bow Valley, and Mount Lougheed. If you fear heights, be mindful of the edge, as it is a sheer cliff on the Bow Valley side. We made it a sunset hike and had an incredible evening on the summit as we descended into the Spray Valley. The descent follows the same route as the ascent. The hike took us four hours to complete.
Rummel Lake

Rummel Lake is a great, easy hike across the Smith Dorrien from Mount Engadine Lodge. The trailhead can be found right off the road and immediately takes hikers on a peaceful and easy trail that gradually gains elevation.
Along the route, there are multiple forest openings from which you can score fantastic views of the Spray Valley. Commonwealth Peak, Tent Ridge, The Fist, and Spray Lakes are notable peaks you’ll see. There’s even a nice bench perfectly placed to take in the views.
After the viewpoint, you’ll continue climbing until reaching Rummel Lake. Here, take a seat and enjoy the lake under Mount Galatea. It’s a tranquil setting and the perfect spot for a picnic lunch in nature. The cirque, headwall, and Rummel Lake are all of particular beauty. This is also a great larch hike during late September!
King Creek Ridge

King Creek Ridge is a bit of a classic ridge and summit in Kananaskis. It’s known for its wild ridge-top views of Kananaksis, which include the lakes and notable peaks. The ridge top features some wild geology with a nice mix of alpine meadow for wildflowers.

All that said, it’s a notably steep ascent which can feel gruelling, but that also means it can be conquered in a short amount of time. We had long known it would be a steep day, so we had put off the hike for years, despite its popularity.

It was not as bad as we expected, but that’s often the case when you come in expecting the worst. That means we feel confident in saying it’s a mountain hike that’s well worth the effort to garner some wonderful views. Prepare for a steep forested ascent from the trailhead with epic views at the top.
Mist Mountain Summit & Hot Spring

Mist Mountain is one of the tallest mountains in the Kananaskis region and offers a significant objective without any technical mountain climbing. Most people head to Mist Mountain only for the hot springs, a short hike through a valley. However, the summit offers some rewarding views and breaks away from the crowds that only visit the hot springs.

The hot springs, with their lovely natural setting, are the attraction that draws most hikers. The hike up to the saddle and surrounding meadows is great and worth completing, even if you’re not after the summit. However, the hot springs are a bit of a letdown outside their photogenic location. There’s only enough space for 4-5 people in the hot springs at once, and they are more like lukewarm springs, which are not exactly ideal in the Canadian Rockies.

However, for a tough day and a sense of accomplishment, set your goals on summiting Mist Mountain. There are several routes up to the peak of Mist Mountain, with many varying degrees of difficulty. The most straightforward and enjoyable ascent is via the south face and east ridge.
This was our choice, as we decided to skip over the Lipsett Col, which has high exposure levels on loose rock. The views from 3,140 meters are pretty great, too! The technical aspects and short approach make the mountain accessible to many able-bodied hikers, so it’s easy to understand its popularity.
Grizzly Peak
Grizzly Peak is an uphill grind all the way up and is not our favourite of these hiking trails. It’s not just a moderate uphill grind but a steep, loose battle. You are gaining 875 meters in 3.2 km, after all. If it weren’t for the epic views at the summit, I wouldn’t recommend this one, as the trail is in very poor condition.
However, once at the peak of Grizzly, you can see endlessly over Kananaskis Valley and even Upper and Lower Kananaskis Lakes. This hike took us four hours round-trip and was perfect for a half-day, regardless of the leg burn. Poles are ideal for the steep downhill climb on small rocks atop packed dirt trails. It would be very easy to slip and slide down the trail.
Opal Ridge

Opal Ridge South Summit is an enjoyable half-day hike with an optional scramble section, should you want to challenge yourself. There’s nothing death-defying about the scrambling, and it is great for beginners. Like many trails, it spends half of the ascent in the treeline before pushing through for magnificent views of the valley. It’s a straightforward trail, but it’s easy to get off it and have a “choose your own adventure” day.

Like Grizzly, it’s a steep climb, but the views from the summit are superb. This hike took us four hours round trip, but you can take on all of Opal Ridge for a more challenging day. There’s plenty of opportunity for an extended summit. Once you reach the south summit, you can traverse back to where you reached the ridge and go left to check out the north view, which is just a couple of hundred meters up (scrambling involved).
Mount Allan

Mount Allan is no short hike with a distance of 15.8 km and an elevation gain of 1,485 meters. It is a great day out with a beautiful summit and no technical scrambling. It’s a steady incline for most of the well-worn and marked path, making it an excellent hike. Mount Allan via Centennial Ridge links Ribbon Creek and Dead Man’s Flats. You can do the entire traverse for a super long day, but it does require two vehicles.
The hike from the car park is a steady but easy incline up from the valley, and it returns the same way. The views start here and never end. Most people stop when they reach the ridge, but it’s worth it to keep pushing and go for the summit of Mount Allan. It’s easy until the final push, and the views across Kananaskis and Canmore are worth it.
Past the ridge, it’s another 1.5 hours to the true summit. Along the way, you’ll see huge pinnacles that look unworldly. These features make this hike one for the books alone. You can continue to Dead Man’s Flats or turn around for an easy and enjoyable hike. The summit of Mount Allan sits at 2819 meters, making it the highest maintained trail in the Rockies, and it is very well maintained!
Arethusa Cirque

Arethusa Cirque is a well-known, family-friendly hike in Kananaskis, and honestly, I wasn’t expecting much from this one. I was wrong about my perceptions of this beautiful hike. The hike starts at Highwood Pass, and you climb up to the cirque before circumnavigating below the cliff walls. It moves just above the tree line and offers outstanding views along most of the trail.
It’s exceptional in late September when the larches turn golden. I would suggest taking this loop trail clockwise. One very steep and loose section is better to ascend than descend – especially with children or older hikers.
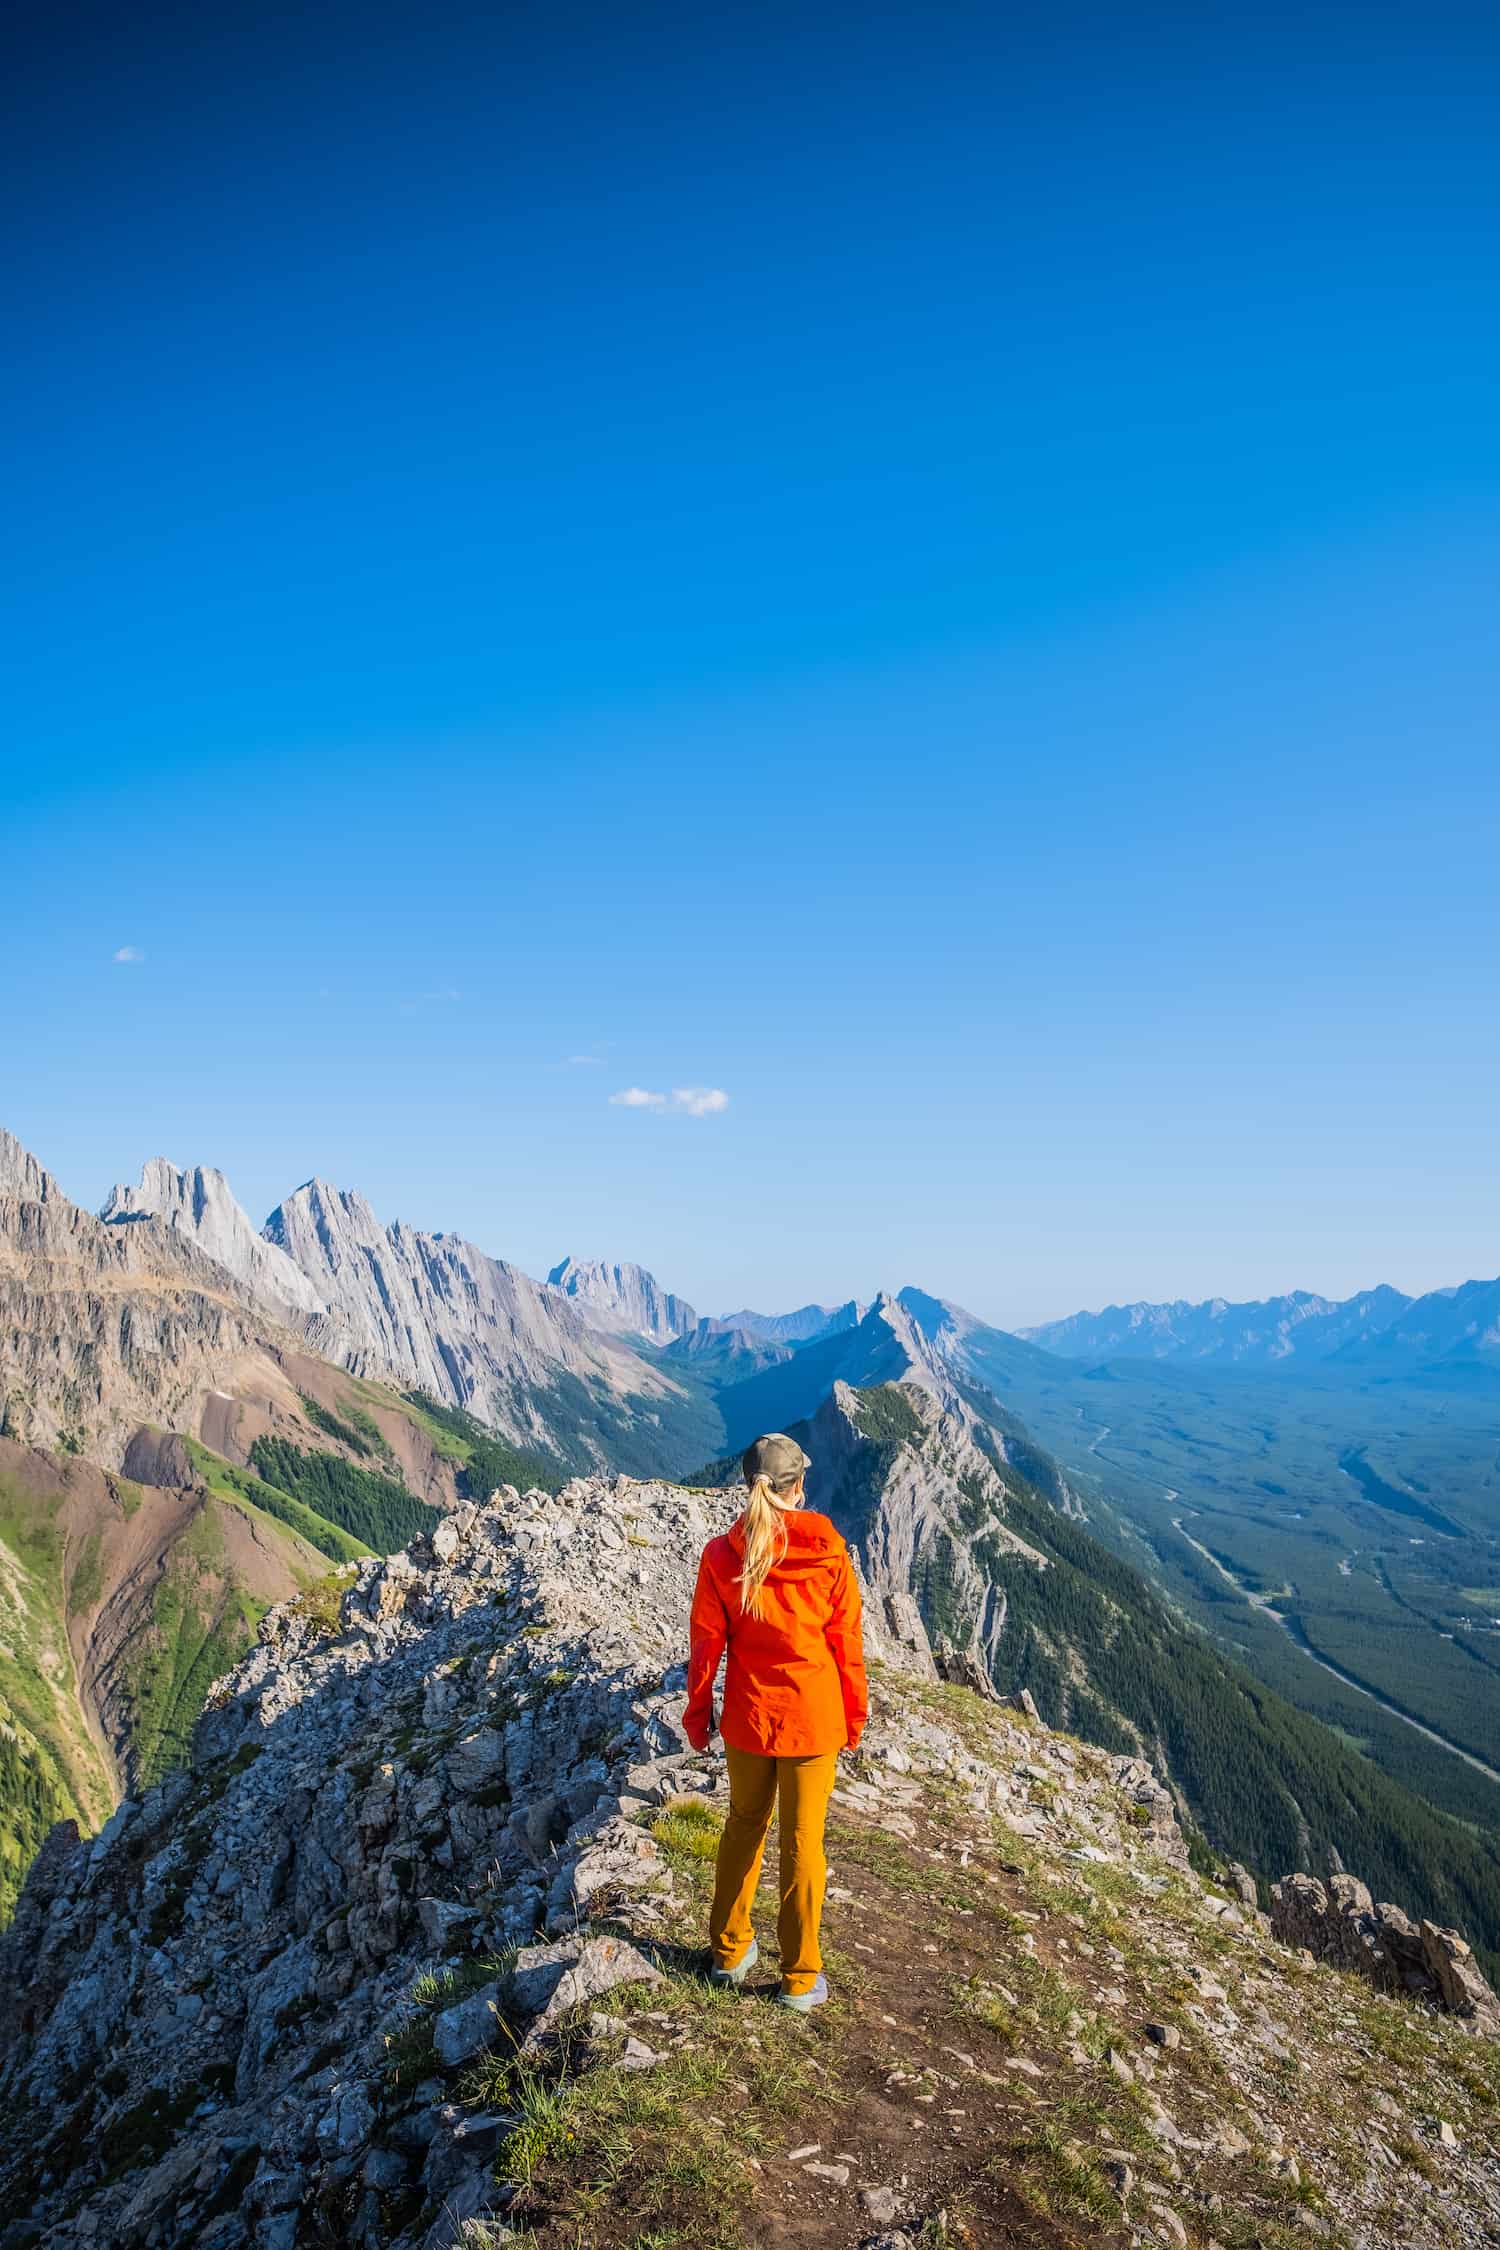
Wasootch Ridge
Wasootch Ridge is a popular hike due to its exceptional views. The hike is straightforward, gains quick elevation, and then travels along a ridge that delivers spectacular views for hours.
The roadway slowly evaporates from view on the ridge before a challenging scramble to the true peak. The scramble can be avoided, and the trail is wide enough for the first 5km with no exposure. The result is an easy dog/kid-friendly hike that doesn’t need to be completed to enjoy, as the views are great early on the trail.

Wasootch Ridge starts hard with a leg-burning climb out of the parking lot. The trail through the woods is not technical, with plenty of traction on dirt. Once you come out of the forest, which takes twenty to thirty minutes, you’ll be treated to some fantastic views of Barrier Lake to the North and Nakiska to the South.
The hike continues along the ridge for several kilometres, where you’ll climb up and down five peaks. Towards the final and tallest peak, the ridge turns into a scramble. The scramble is complex, with several moves that are high-exposure. Most hikers either turn around before this point or at the beginning of the scramble.
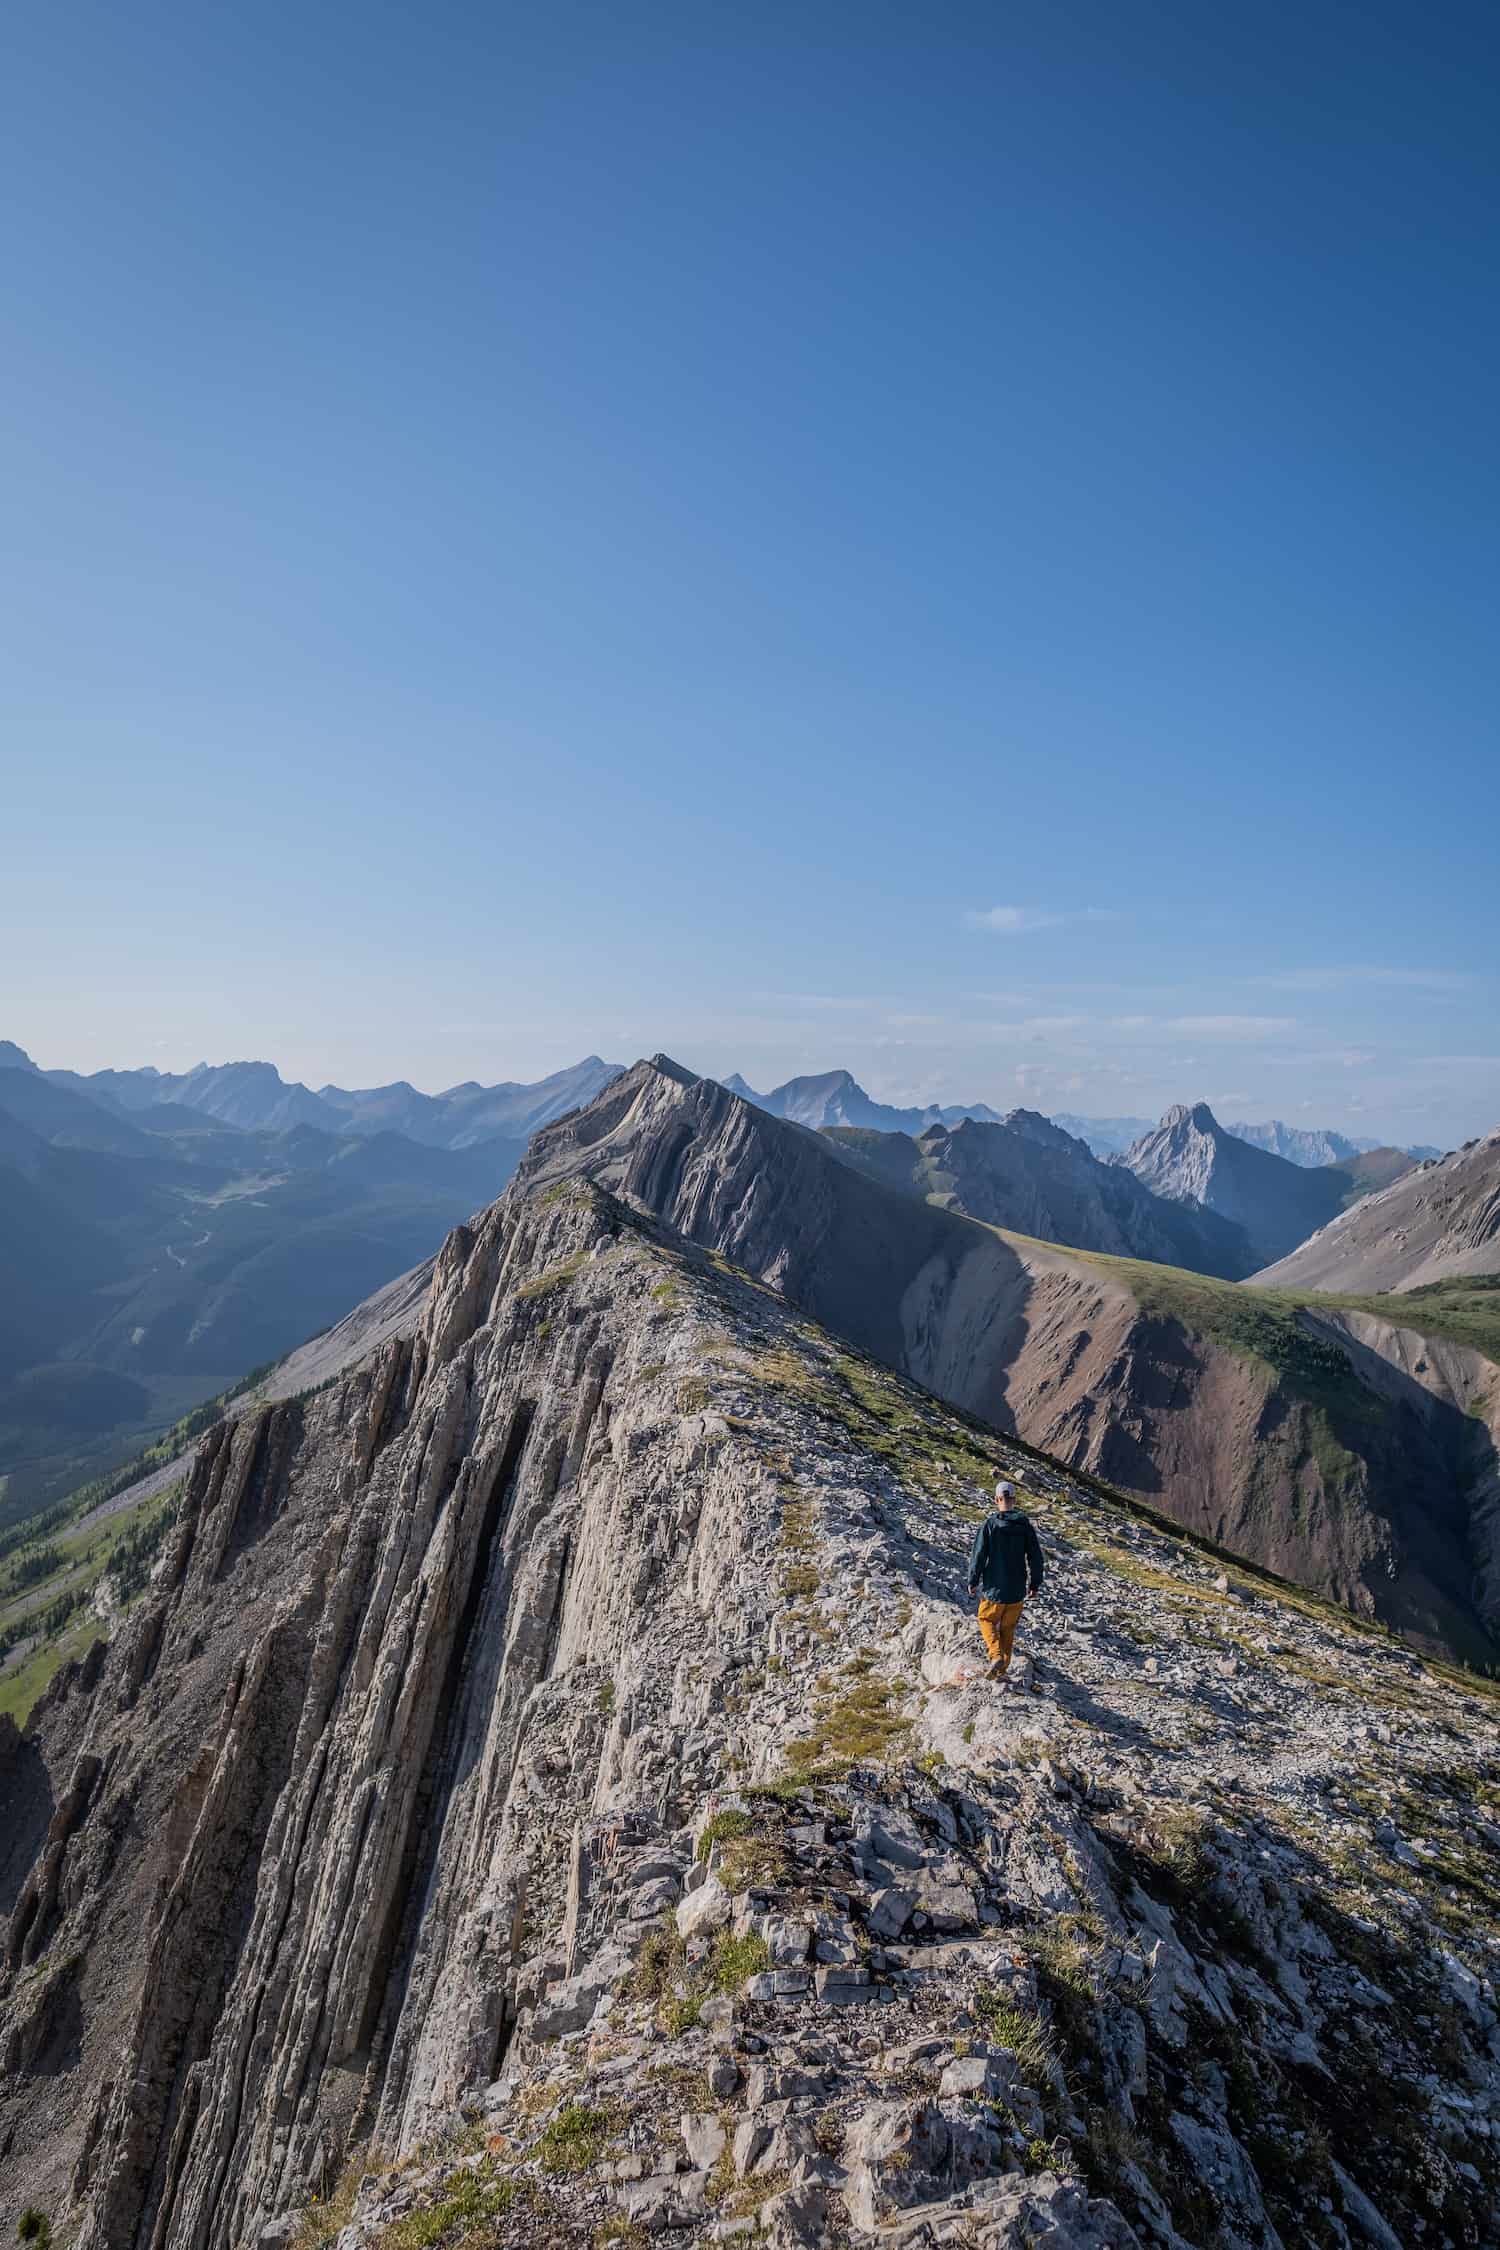
Porcupine Ridge

Right across the valley from Wasootch Ridge is Porcupine Ridge, and it’s a similar hike. It starts off steep initially, and as you get on the ridge, you walk the ridge most of the way until the summit, with stunning views the entire time. The main difference here is the beginning. Instead of starting straight off like Wasootch, you must navigate along Porcupine Creek, crossing a few times before ascending towards the ridge.

The ascent to the ridge is pretty easy. Once on the ridge, you can stop and enjoy the views. We saw many parties doing this. However, I highly recommend continuing to the true summit (we didn’t see many others doing this). The views get better and better, and the crowds clear out. If you push on, there is a short, easy scramble section to navigate before reaching the end, marked by a cairn.
Carnarvon Lake

Carnarvon Lake has been making the rounds on social media due to its location nestled between two mountains. The lake is outside Kananaskis and on crown land in the foothills, meaning you can wild camp here. It’s a particularly popular spot on the weekends and can attract a crowd.


From the start of the trailhead, it’s 10km to the lake, which has 850 meters of elevation gain. There are a few views, but it’s exceptionally dull until about the 8 km section. The good news is you can bike the first section of the hike. If that’s your plan, bring a bike chain and attach it to a tree. It makes for a quick day and a much more thrilling time back to the trailhead.

From the 8 km mark, the hiking opens up to beautiful views and is a steady climb on a scree trail. The final section of the lake requires ascending a rock wall with several waterfalls. It’s mild scrambling, and the steepest section has a chain to assist with the ascent. It is something to consider if you plan to camp with a heavy hiking backpack and gear.
After gaining the rock wall, hikers arrive at the lake and find a section on the opposite side with small trees that offer a nice refuge for campers. The cirque above the lake offers phenomenal views and increases the hike’s elevation gain. Prepare for a big day of hiking if visiting as a day hike, and a water crossing near the start of the hike.
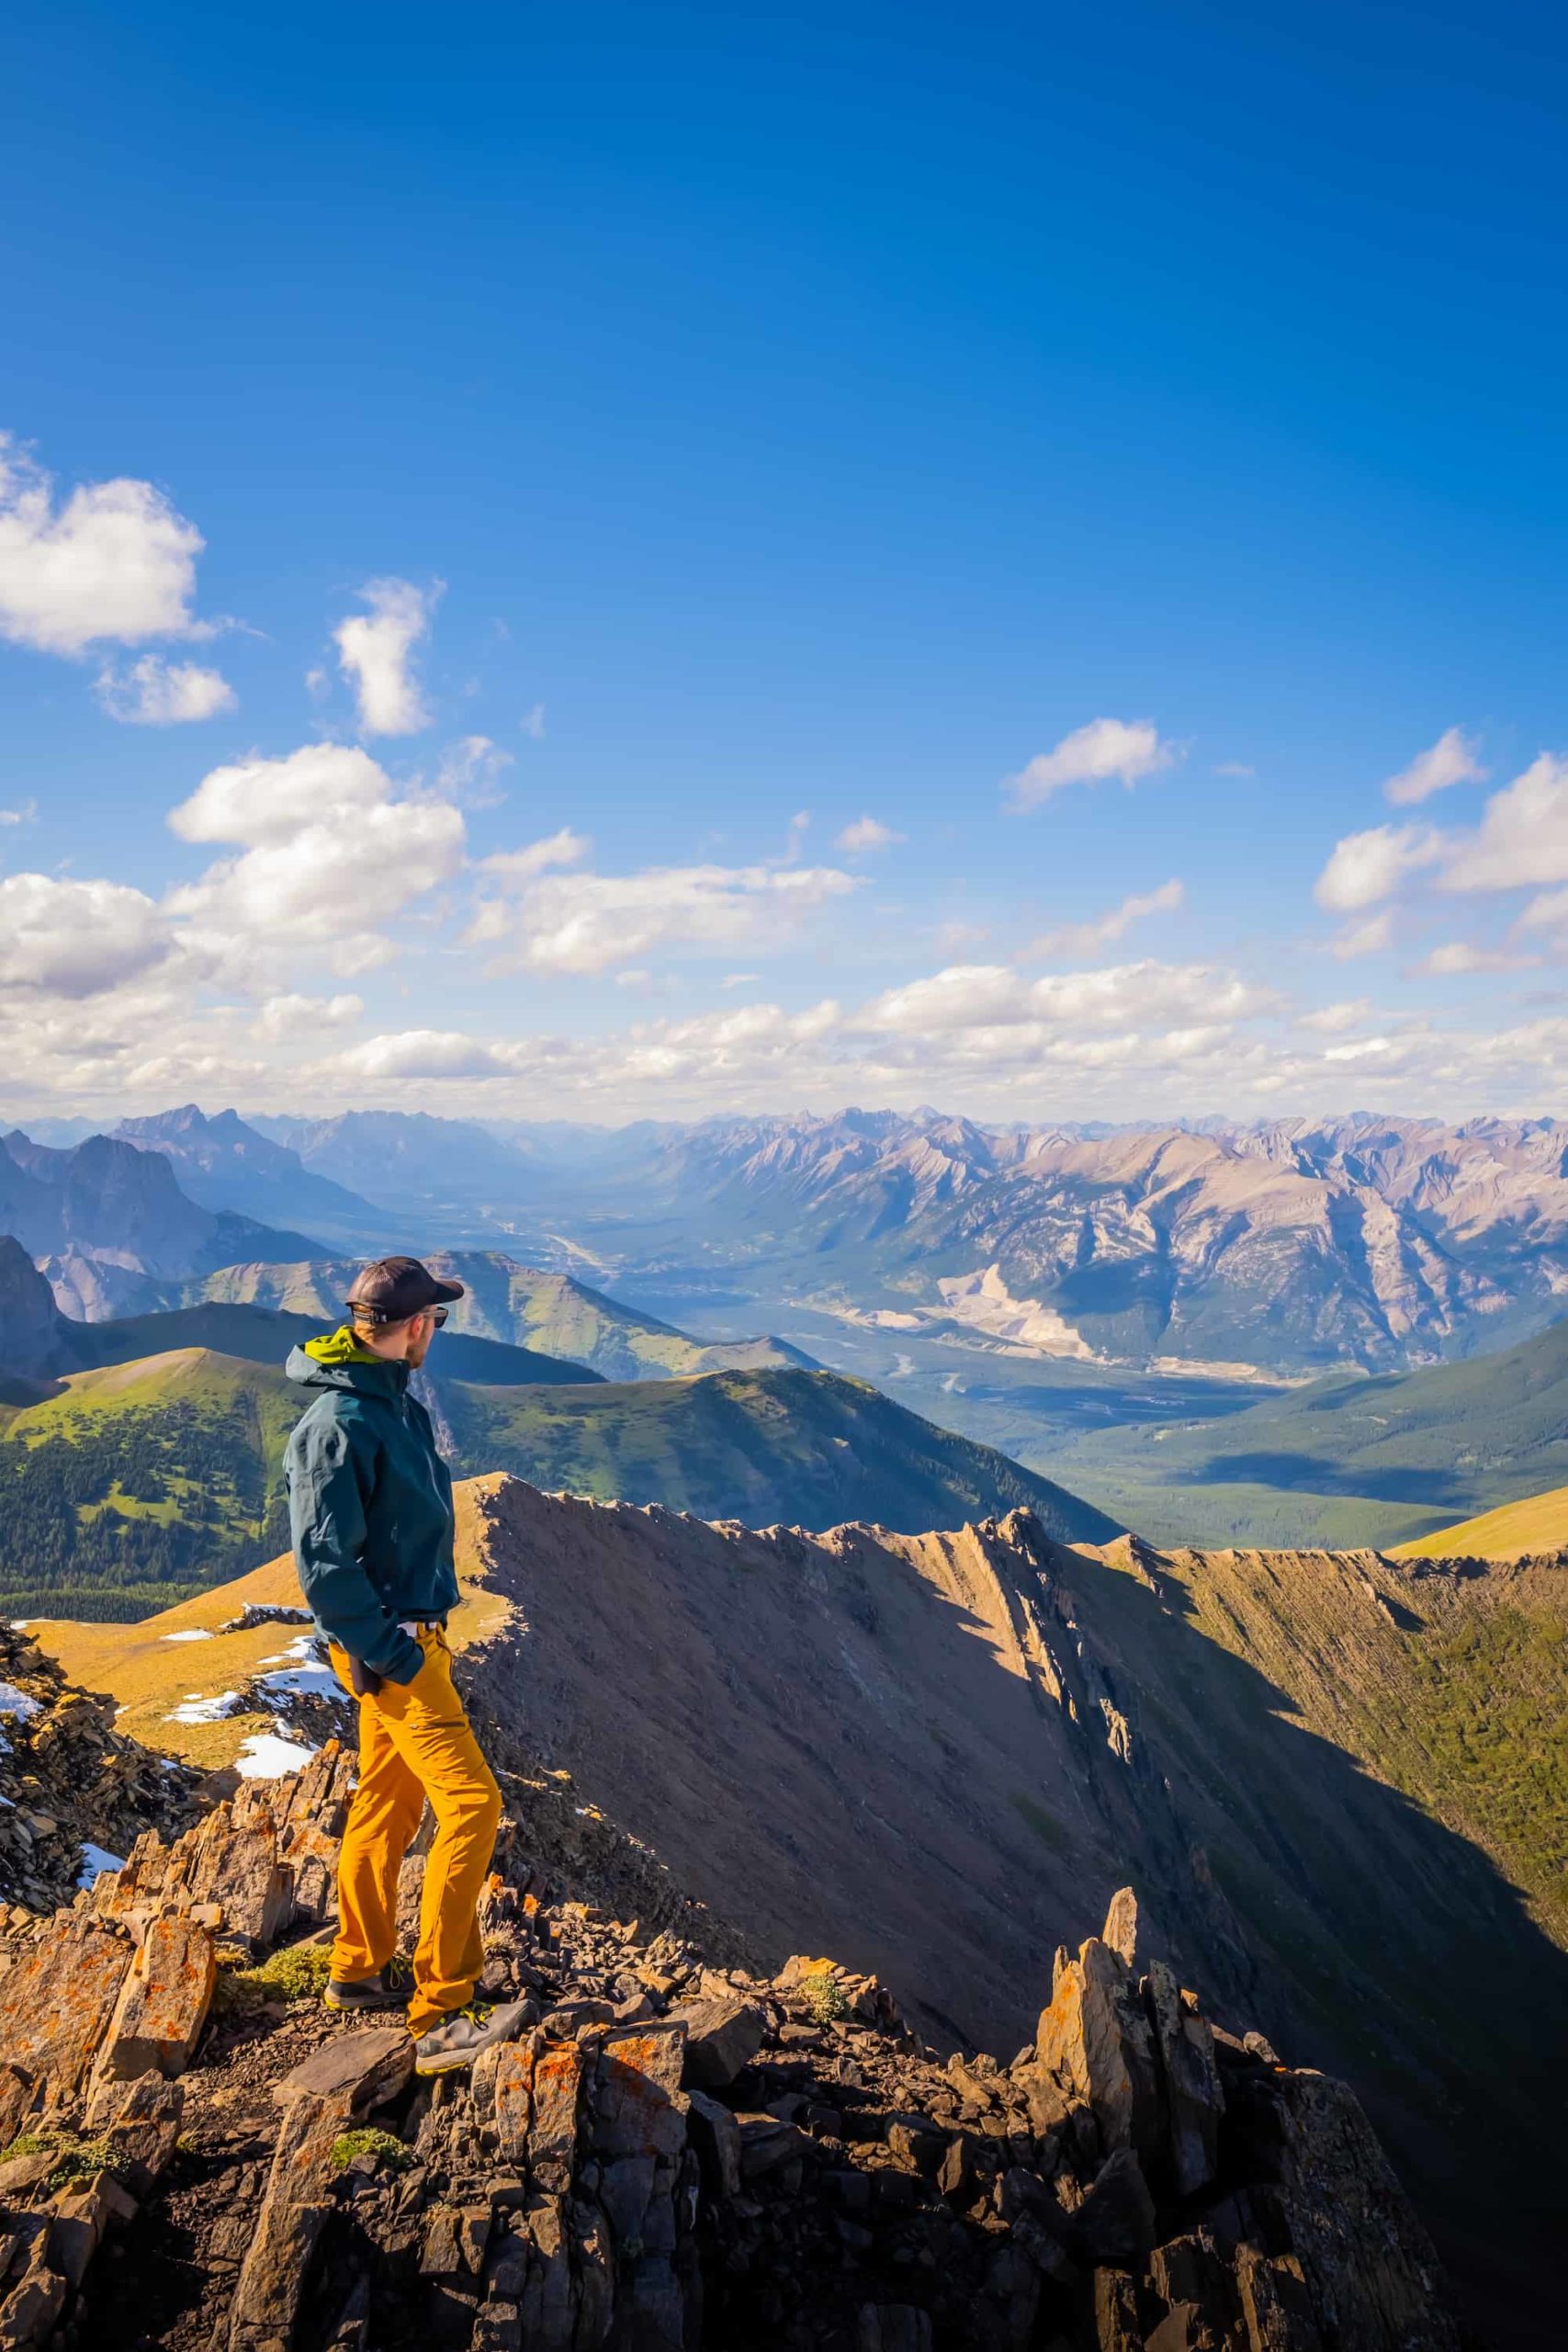
Mount Kidd Fire Lookout

If you’re after a gruelling and steep hike, then be sure not to miss the Mount Kidd Fire Lookout. What starts out as a mundane walk in the forest, leaving from Kananaskis Village, quickly turns into a power walk straight up a steep dirt path until you reach the fire lookout.
This one is a fairly quick hike, and can be completed in under 3 hours round trip, but your thighs and knees will pay the price. While steep, the views at the top are simply amazing, and you get up close and personal to Mount Kidd. Bring poles for the descent on this one!
Piper Pass

Piper Pass was once a relatively unheard-of pass and cirque that branched out from the popular Elbow Lake Trail. The cirque and meadows that lead up the pass are exceptionally beautiful, with plenty of wildflowers and prime habitat for wildlife. You should be bear-aware on the trail, particularly near the streams and thick woods below the meadow.

We did not see any bears, but did see a large herd of bighorn sheep. Due to the pass’s relative obscurity, we also enjoyed the trail to ourselves as the sole visitors on the day of our hike in July. The trail braids off from Elbow Lakes and requires some route finding across several creeks and overgrown trails. On our hike, the route was marked with small orange flags through the woods.

The trail eventually reaches a wonderful valley below Mount Elpoca, Tombstone Mountain, and Mount Schlee. It passes through wildflower-filled meadows before reaching the pass, a steep 300-meter scree slope that is a grind but can be done fairly quickly. The ascent is well worth it, as the views from the top are spectacular.
Pocaterra Ridge

Pocaterra Ridge is one of the most popular Kananaskis hikes on this list. Mainly because it’s one of the best larch hikes in the Canadian Rockies. This area has so many larch trees it’s hard to believe. When the needles start to turn yellow, this is one of the first places you should head. Although if you can try to avoid weekends, it’s a busy one. It’s also a gorgeous hike, no matter the season!

Pocaterra Ridge is best done as a point-to-point hike, so I would try to do it this way if you have two cars. If you only have one car, you can still do it as an out-and-back hike called South Pocaterra Ridge and get amazing views. The turnaround for it would be at the summit of Pocaterra Ridge. The out-and-back would put your day at 9.3 km and 745 meters of gain.

You follow the trail network until you reach the open valley to do this. Make sure to stay on the trail, though. Scores of people going off-trail have caused this trail to become extremely braided and confusing to navigate. Once it opens up, you can continue along Pocaterra Cirque, which only takes you 430 m up and is easier than summiting the ridgeline. Once you reach the ridge’s summit, about 600 meters up, you can either keep walking the ridge with some easy scrambling or head back down!
Rimwall Summit

Rimwall Summit is similar to Windtower and Reads Tower, which are mentioned higher on this list. You get similar views over the Spray Lakes. We did not enjoy Rimwall as much as Windtower, mainly because it felt like more of a grind-up, never-ending scree.
Nevertheless, it’s a great hike that provides breathtaking views. Some easy scrambling is involved, and it definitely requires some navigation skills around West Wind Pass.

It can be easy to get turned around when heading up Rimwall. It’s best to download a map to your GPS and study reviews, but take a left well before West Wind Pass.
If you get cliffed out, you’ve made a mistake. You will know you are on the right trail when a huge scree slope in front of you feels never-ending. It’s steep and unforgiving. I would bring a helmet and gloves, especially on the weekend – this can get busy.

Once you climb up most of the scree, you’ll think you have reached the top, but you haven’t. You need to continue along the ridge and hike to your left to the top of Rimwall.
Don’t get too close to the edge – it’s a straight cliff. As you near the summit, around 2.8 km, some light scrambling will be involved over cliffs. Once you reach the summit, you’ll have stellar views over the Spray Lakes and the back of the Three Sisters.
Yates Mountain (Prairie View Trail and Jewell Pass)

Barrier Lake is one of the most popular spots in Bow Valley Provincial Park. It’s a lovely lake in Alberta and one of the best hikes near Calgary. Besides being beautiful and one of the most accessible Kananaskis trails on this list, you can reach it in less than an hour from Calgary, as it’s right after the Kananaskis entrance.

Visitors can enjoy the lakeshore or go for a moderate hike to the Prairie View lookout point, head up Jewell Pass via the Prairie View trail, or continue up to Yates Mountain and check out the Barrier Lake Fire Lookout. There are a lot of options here!

Hiking up Prairie View Trail is one of the most visually rewarding Kananaskis hikes relative to effort. It’s a smooth, well-maintained trail that runs the entire way, with stunning views over Barrier Lake. At just under an hour, it can quickly be done at sunrise or sunset. It’s also good to go all year round – even in the winter.
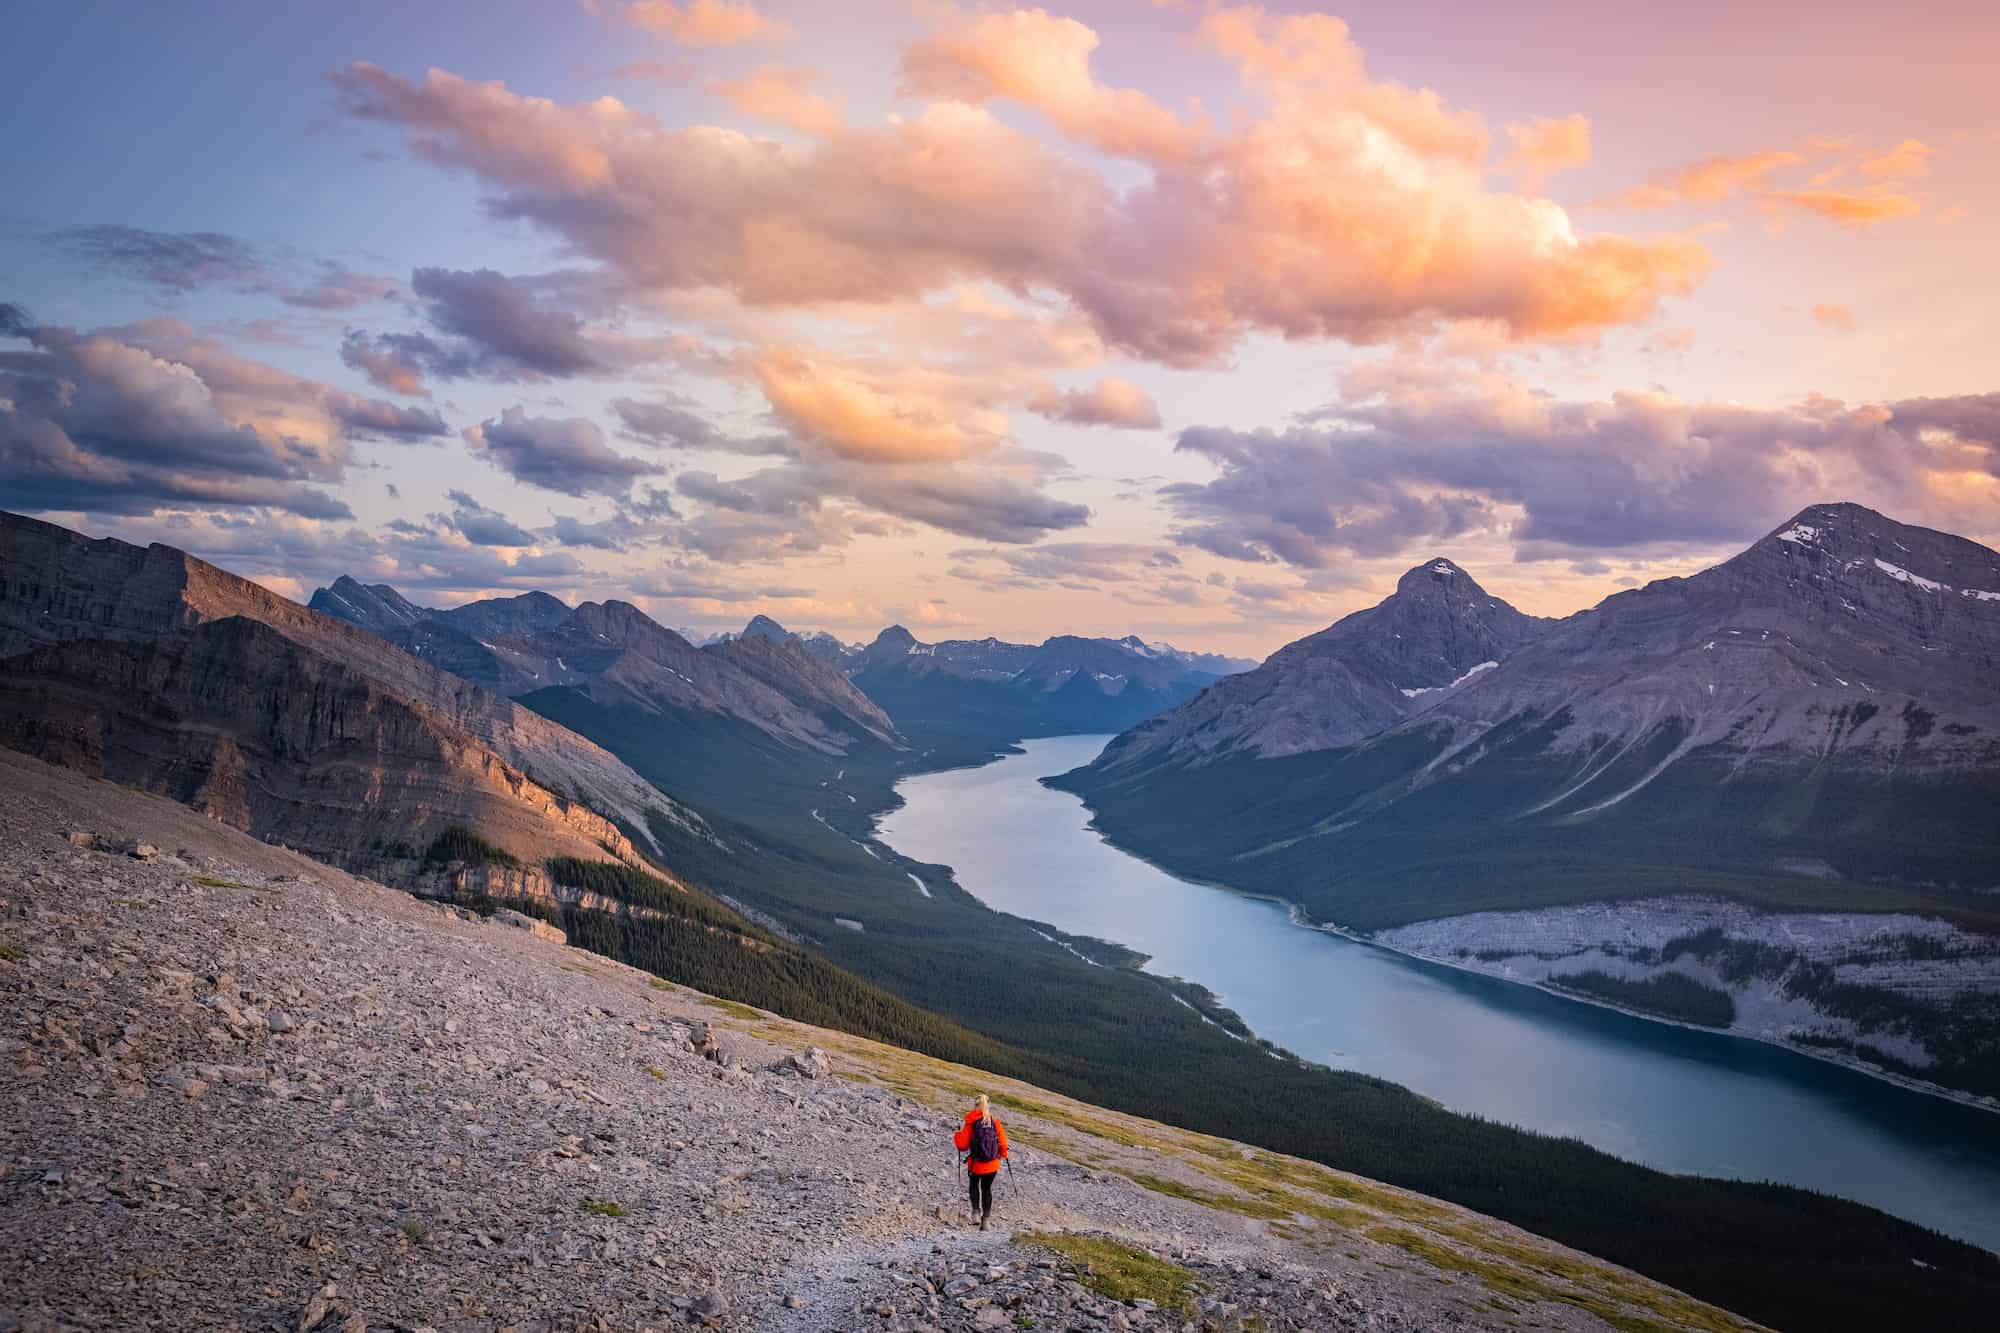
Sarrail Ridge via Rawson Lake

Rawson Lake is a beautiful Alberta lake suitable for a wide range of abilities. When combined with Sarrail Ridge, it makes for a quick, classic hike in the Canadian Rockies. The views, particularly from Sarrail Ridge, are stunning, but you’ll have to put in plenty of work.
For a milder adventure, the hike up to Rawson Lake is a great beginner’s hike. It’s about a 300-meter elevation gain and can be done early or late in the season. It skirts around Lower Kananaskis Lake and crosses a waterfall before ascending 300m to the enchanting Rawson Lake.

If the bugs aren’t bad, it’s the perfect spot to enjoy lunch before heading back down. To get the views in the photos above, Kananaskis Lakes, you must continue working for them. If you’re continuing up to Sarrail Ridge, the trail winds around Rawson Lake to the southeast before climbing the ridge to the Northeast. The ridge climb is a bit of a slog and goes straight up the avalanche chute and prime grizzly bear habitat.
You reach the ridge at the top of the path, which provides unreal views. Once you reach the top of the pass, you can look out over Upper and Lower Kananaskis Lakes and Mount Indefatigable. We spent over an hour on the ridge exploring, taking photos, and enjoying the view.
Rawson Lake took us just under 45 minutes from the car park, and continuing to Sarrail Ridge took another hour. That was at a pretty good pace with some miles under our legs. This hike can be done in 4-5 hours round-trip.
Lillian Lake and Galatea Lakes

If you enjoy hiking to serene alpine lakes, look no further! The Lillian and Galatea Lakes hike via Galatea Creek is an absolute gem in Kananaskis Country. If you hike to Galatea Creek, you will find three enchanting lakes nestled beneath rugged peaks. This out-and-back trail offers a delightful combination of gushing streams, a well-marked path, and breathtaking vistas.

It caters to hikers with varying intensity preferences, making it an ideal choice for all. The best part is you can hike just to Lillian Lake or continue to both Galatea Lakes for an epic day out. Though in our opinion, if you already make the long trek back to Lillian Lake, you may as well keep going to lower and upper Galatea Lakes.
For those seeking an extended multi-day adventure, consider reserving a campsite at Lillian Lake for an easy backpacking excursion, fully immersing yourself in this area. As the Lillian Lake backcountry campground is 6km from the trailhead and can be reached in under two hours, it is a great place to camp if you are a newbie camper.
Burstall Pass

Burstall Pass is a classic hike in Kananaskis Country and off Smith Dorrien Trail. The hike moves past several marshy lakes and streams before a steep ascent up to an alpine meadow and then finishes on a high mountain pass with grand glaciated mountain views.
We loved our time in Burstall Pass and spent most of our time alone in the woods. It’s a long one at 16 to 18 km, depending on how far you go. It’s also a little redundant since it’s an out-and-back trail with a very boring 4km road to walk, but in general, it has everything you could want out of a hike.

The trail spends several kilometres in the forest before you reach the alluvial fan of the Robertson Glacier. Come prepared for smart route-finding to cross the creek, waterproof shoes, or hiking sandals. The fan spreads across the trail with multiple streams and flooded sections.
It wasn’t difficult, but it took some time to make it across the streams without getting wet, which were about 500m long. Some helpful signs mark the trail for hikers to follow across the plain.

After you make your way across the flooded sections of trails, you reach more forest. This is where the trail begins to ascend to an alpine meadow. It’s a steep climb, but easy enough for most people to handle without too much of a struggle.
It takes around a half-hour to reach a sub-alpine meadow filled with wildflowers, where you can continue up to the top of the pass, providing stunning sights of Mount Birdwood.

In the winter, Burstall Pass is popular with snowshowers and backcountry skiers, but you’ll want avalanche knowledge and gear if you make your way back here during this time.
Grassi Lakes

Grassi Lakes is the perfect hike for friends and families. It’s an easy trail with a wide path that leads through the forest up to two sparkling turquoise lakes. This is a great choice if you’re looking for a child-friendly hike in the Canmore/Banff area. Grassi Lakes are two sparkling teal alpine lakes with two of the most famous peaks towering above. On the way up to the two shallow lakes, a few viewpoints offer wonderful panoramic views of the town of Canmore down below.

This is where we take visitors who want a short and straightforward hike to beautiful lakes. There are two options to see Grassi Lakes: a challenging hike and a more leisurely hike. Take the hard one; it’s not bad. Compared to any other hike on this list, Grassi Lakes (hard or easy) is a walk in the park.
For rock climbers, several rock faces are famous for rock climbing. Routes are pretty easy to find, with many bolts in place. The trailhead begins on Spray Lakes Road, around 2 km past the Canmore Nordic Center. You’ll see a small sign that says “No Exit” on the left and a gravel parking lot on the right. Drive down the hill to the parking area and sign for the Grassi Lakes Trail.
Ha Ling Peak

Our final hike on this list needs no introduction. Ha Ling Peak is the most popular mountain summit in the Canadian Rockies. Climbing the mountain is a rite of passage in the Rockies, and visitors come from all over Alberta every weekend to conquer Ha Ling Peak. Its popularity does not mean it is easy or shouldn’t be taken seriously. It’s still a peak in the Rockies, meaning there will be some effort to reach the summit.

Alberta Parks has invested a lot of money into the trail and infrastructure around the mountain. It includes a large paved parking lot with information and long drop toilets at the top of Goat Valley. Along with parking, the trail to the summit is machine-built with grading, switchbacks, steps, and handrails in certain locations.
The improvement has increased the safety of the trail, but make no mistake, it’s still a tough physical challenge for many. Once you enter the trailhead and go through the forest, it’s a constant uphill climb to the summit. Prepare for a full day and a physical challenge if it’s your first summit in the mountains.
More Information
What is a Scramble?

This hiking guide lists some scrambles. While most of the hikes are steep, there may be sections where scrambling is involved. This will be noted in the text.
What is a scramble? Scrambling is a walk up steep terrain involving one’s hands. Three contact points with your body are typically needed to classify a hike as a scramble. I love scrambling as it’s more challenging than hiking, and it’s typically required to summit most of the peaks in the Rockies.
It’s a prevalent sport in the Rockies, but should not be confused with hiking. Some scrambles are very dangerous, with significant exposure and route-finding skills required. They should be approached with respect and require research and proper safety equipment, such as GPS, poles, and helmets.
Some scrambles are not straightforward and do not have a defined trail, meaning route finding and a sense of adventure are needed. August is the best time to scramble as most of the snow has melted off the mountain peaks.
Hiking Gear We Recommend

It’s tough to beat the comfort and stability of the Speedgoat. A more technical shoe would be the Salomon X Ultra.

It’s always jacket season in the Rockies. We always carry a down jacket on every adventure.

This nifty clip from Peak Design secures a camera to my backpack strap for easy reach. No more digging in the backpack!


A lightweight backpack is perfect for most hikes in the Rockies. We suggest keeping it simple and carrying the basics.

In case of emergencies, we carry a GPS-enabled emergency beacon. Solid for regular backcountry users.
Advice on Hiking in Kananaskis

- If this is your first time hiking in the Rockies, take a conservative approach—read our post for beginner hikers, too. Pick an adequate hike for your fitness level, plan for plenty of time, pack water and food and don’t be afraid to turn around. We have a great post if you want to learn more about what to wear hiking in the Rockies.
- For long Kananaskis hikes, set a turnaround time at the departure. Whenever we set out for an objective, I determine when to turn around to arrive at the parking lot or campsite by dark. I recommend not hiking in the dark as it’s easy to get lost, and it’s not fun in bear country.
- Always carry bear spray if you plan to hike in the park. We carry ours even in our neighbourhood, and bears have been known to stroll through town and busy parking lots. When on a trail, always practice wildlife awareness, and please give animals space.
- Dogs are allowed on these Kananaskis hikes but must be kept on a leash for the entire hike.
- Regarding times, keep in mind your mountain fitness — it’s much different from gym fitness. The low end of the times in this post is a constant fast pace uphill with little to no breaks and a brisk pace downhill. Most hikers should plan for a middle-of-the-road time with the estimated duration.
- It’s also important to know that there are limitations and to come prepared. These are very serious mountains, and it is easy to get in well over your head with life-threatening consequences. That being said, all of these hikes in Kananaskis should pose no/little risk if you stick to the trail.
- Have a form of navigation and study the route before departure. We highly recommend you study the route through trip reports. We have some great ones, along with many other avid hikers and mountaineers around the Rockies. Also, have some form of navigation. The easiest option for beginners is Alltrails, which provides reliable enough navigation for popular trails.
Searching for Easier Hikes in Kananaskis?

For those after a more leisurely time outdoors, make sure to read on to find some easy hikes in Kananaskis.
The Best Places to Stay in Kananaskis

One of the best places to stay in all of Kananaskis Mountain Lodge, which also operates the amazing Kananaskis Nordic Spa. If you’re looking to stay in Kananaskis specifically, we highly recommend Mount Engadine Lodge. It’s near the trailheads of Tent Ridge and Smutwood Peak!
Plan Your Trip to the Canadian Rockies

If you’re heading to Western Canada soon make sure to check out our interactive map with over 450 spots to help you plan!
- ✅ Hiking trails with links to trails & insider tips you won’t find online
- ✅ Our favorite photo spots, scenic views, waterfalls, must-visit attractions, and even swimming holes
- ✅ Our favorite restaurants, coffee shop & local spots that many skip.
- ✅ We add as we explore ourselves. That means we add new points every month!
- ✅ Map works with Google Maps!
- ✅ Pre built itineraries you can replicate,
- ✅ Discover spots via an ad-free interactive map and a grid, full of original content and videos
- ✅ Use on the go, mobile-first, offline-friendly, and made for the road.
- ✅ Local insights you won’t find on Google or AI – all in one place!


Amazing read all the way. Very informative and the photos are stunning. Thank you for sharing your adventures. I will add them to our list definitely. Happy trails..
Thanks so much! Hope that you found a few more hikes to tackle this summer. Kananaskis can be such a gem and there is so much to explore, it may take a lifetime.
Awesome read. Thank you. Happy trails 🙌
Hi,
This is very helpful and informative! I am travelling solo to Banff in late august and planning to hike Mt Smutwood and Tent Ridge. I am not familiar hiking in Rockies, therefore as for my own safety, it would be wiser to hike with other people. Do you know where I could meet up/contact other hikers or join a group?
cheers
Nas
Try joining the Facebook group “Hike Alberta” people are often looking for hiking partners there!
Thank you very much for great posts about Banff, getting a lot of inspo from here!<3
These are such Beautiful Places. Kananaskis is Beautiful.. Thank you for sharing this amazing Guid blog.. I appreciate your passion and work. I am from Pakistan.
Beautiful views
Thank You
I’m a bit concerned with EEOR being listed as moderate-difficult. This is definitely more involved than Ha Ling, also listed as the same difficultly level. There is significant overhead hazard from people knocking rocks down but hardly anyone brings a helmet up here, a definite oversight. EEOR sees some of the most SAR rescues in the area and should be approached with caution.
It may not be a long scramble but I think it should be considered ‘difficult’ for your average hiker.
It is listed as a moderate/difficult and it notes there is scrambling – very notably in parentheses. If you actually read the description it mentions everything you said about the difficulty, including the helmet.